
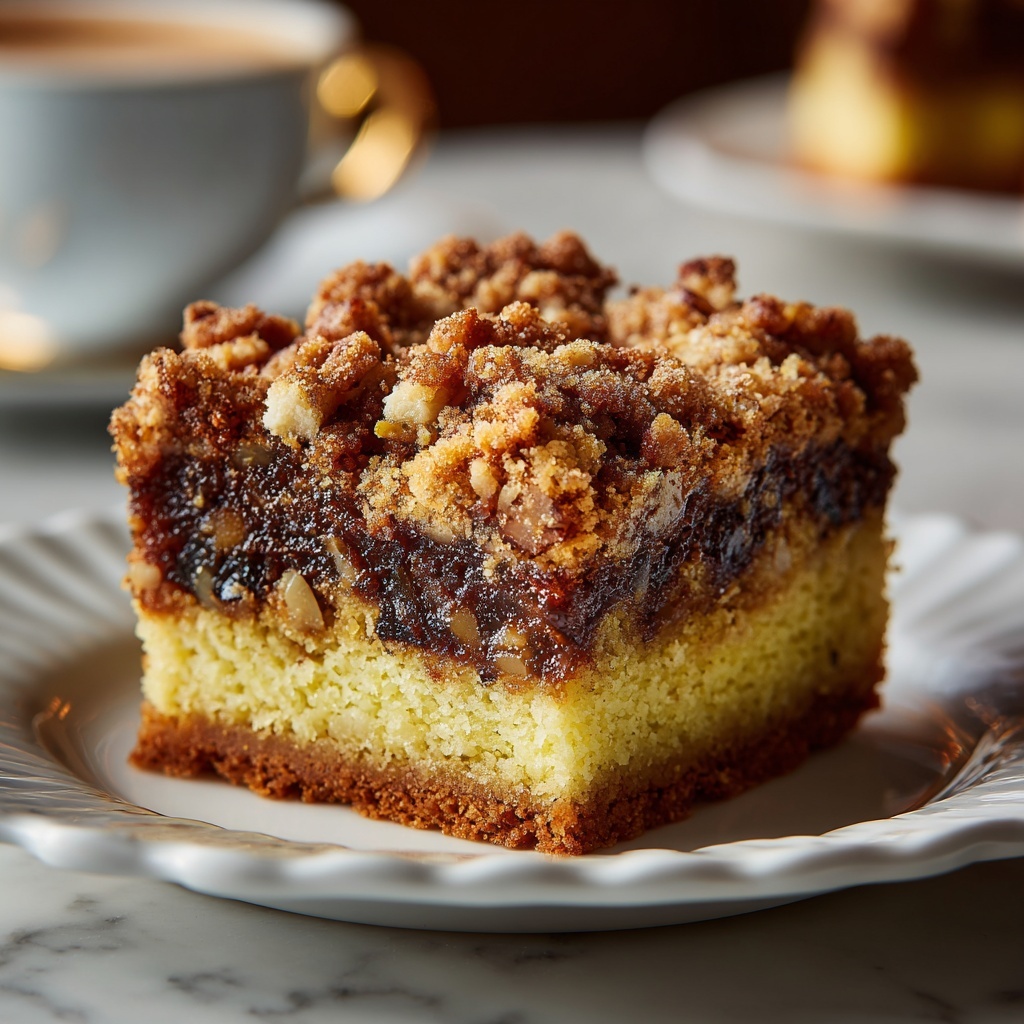
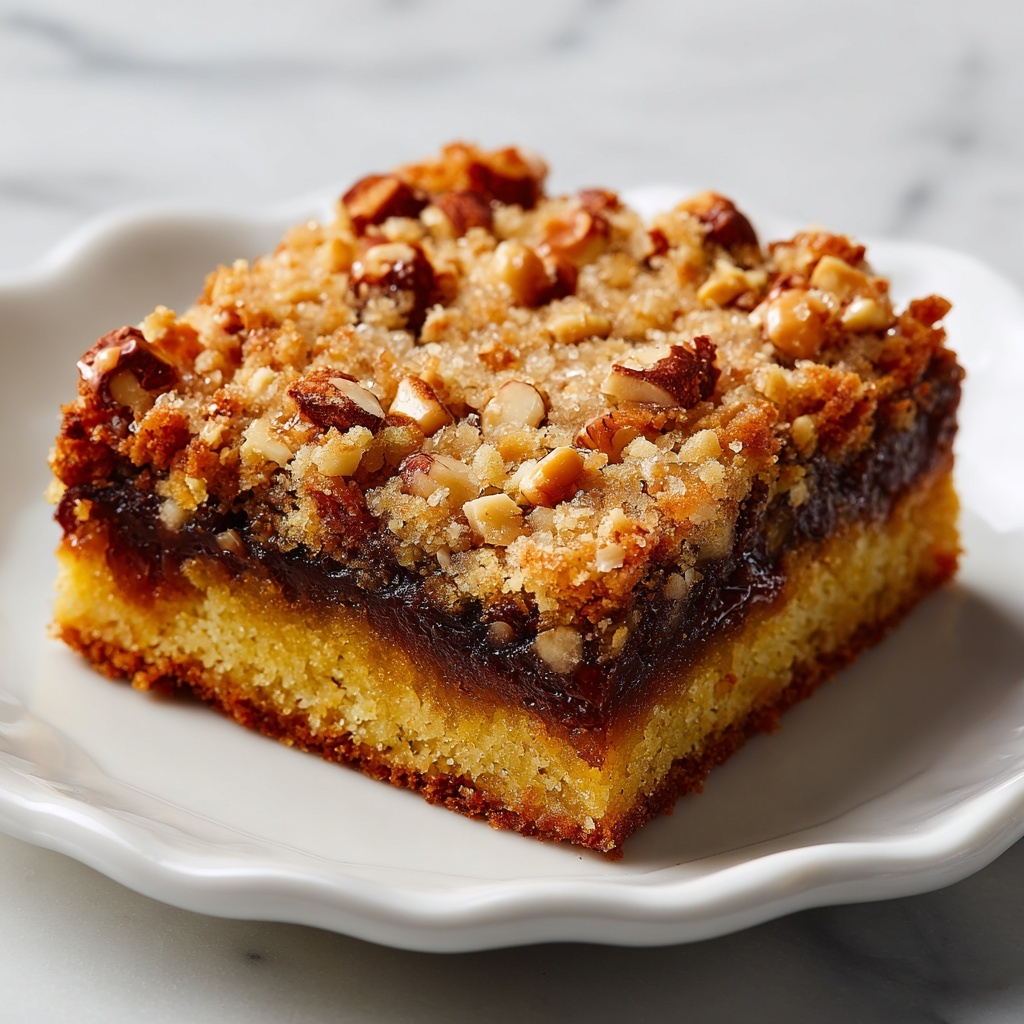
There is nothing quite like sinking your teeth into rich, chewy, and gooey bars that ooze caramel goodness while boasting a perfect hint of chocolate and oats. That’s exactly why I’m so excited to share The Best Carmelitas Recipe with you. These caramel oat bars combine a buttery base with sweet caramel bits and melty semi-sweet chocolate chips, delivering a mouthwatering treat that feels like an indulgent hug in every bite. Whether you’re baking for a crowd or craving a cozy dessert, these bars are guaranteed to become your new favorite go-to.
Ingredients You’ll Need
To create The Best Carmelitas Recipe, you’ll want simple, pantry-friendly ingredients that come together in a way that gives you the perfect balance of flavor and texture. Each item plays a role in making these bars irresistibly chewy, sweet, and satisfying.
- Unsalted butter (1 cup, melted): Adds richness and moisture for a tender crumb without overpowering the sweetness.
- Brown sugar (1 1/2 cups, packed): Provides deep caramel notes and contributes to the chewy texture.
- Large eggs (2): Bind the ingredients together while offering slight structure to the bars.
- Vanilla extract (1 teaspoon): Enhances the sweetness with a fragrant warmth.
- All-purpose flour (2 cups): The backbone of the bars, balancing the luscious mix.
- Baking powder (1/2 teaspoon): A touch of lift to keep the bars from feeling too dense.
- Salt (1/4 teaspoon): Elevates flavors and balances the sweetness perfectly.
- Old-fashioned rolled oats (2 cups): Adds a pleasantly rustic chew and nutty flavor.
- Semi-sweet chocolate chips (1 cup): Melts beautifully to provide pockets of chocolatey surprise.
- Caramel bits or soft caramel candies, chopped (1 cup): The heart of the dessert, for that luscious gooey caramel punch.
How to Make The Best Carmelitas Recipe
Step 1: Prepare Your Pan and Oven
Begin by preheating your oven to 350°F (175°C). Grease or line a 9×13-inch baking pan with parchment paper, making sure to leave an overhang on the sides. This tear-friendly edge is a small but brilliant trick that’ll help you effortlessly lift the bars out once they’re cooled.
Step 2: Mix the Wet Ingredients
In a large bowl, whisk together the melted butter and brown sugar until the mixture becomes smooth and glossy, like the start of something truly decadent. Next, stir in the eggs and vanilla extract, blending everything together into a silky batter that will serve as the foundation for your caramel delight.
Step 3: Combine the Dry Ingredients
In a separate bowl, sift together the all-purpose flour, baking powder, and salt. This step ensures even distribution and prevents any lumps, which is key for a uniform texture when baked. Gradually add the dry mixture to your wet ingredients, stirring gently until just incorporated — be careful not to overmix to keep the bars tender.
Step 4: Add Oats, Chocolate, and Caramel
Once the batter is ready, fold in the rolled oats, then carefully stir in most of the chocolate chips and caramel bits, saving a small handful of each. These saved bits will top the bars, giving a gorgeous, melty sprinkle of caramel and chocolate that makes these bars stand out.
Step 5: Assemble and Bake
Press half of the batter evenly into the prepared pan, smoothing it down to create an even base layer. Sprinkle the reserved chocolate chips and caramel pieces evenly over this first layer, ensuring every bite has gooey surprises. Crumble the remaining batter on top over these layers — it’s okay if it looks a bit rustic; that’s part of their charm. Pop the pan into the oven and bake for 30-35 minutes until golden brown and the caramel bits are bubbling with sweet promise.
Step 6: Cool and Slice
Allow your freshly baked Carmelitas to cool completely in the pan. This step is crucial as it lets the caramel set slightly, so the bars hold their shape when sliced. Use the parchment overhang to lift the bars out, then cut into 12 generous servings — be ready to watch these disappear fast!
How to Serve The Best Carmelitas Recipe
Garnishes
For an extra special touch, dust your caramel bars with a light sprinkle of flaky sea salt to offset the sweet caramel and chocolate. A drizzle of melted dark chocolate or a scoop of vanilla ice cream on the side brings out the best in these caramel treats, making every bite even more irresistible.
Side Dishes
The Best Carmelitas Recipe pairs wonderfully with a hot cup of coffee or a creamy latte, turning any mid-afternoon snack into a cozy occasion. For gatherings, consider serving alongside fresh fruit like sliced apples or berries to balance the richness.
Creative Ways to Present
Want to impress friends? Arrange these bars stacked on a wooden board, alternating with small bowls of caramel sauce and chocolate chips for dipping. Or, cut them into bite-sized pieces and serve on sticks for a fun caramel bar lollipop presentation that’s sure to spark curiosity and delight.
Make Ahead and Storage
Storing Leftovers
Once cooled, store your Carmelitas in an airtight container at room temperature. They will stay moist and delicious for up to 4 days, making them perfect to bake ahead for a busy week or unexpected guests.
Freezing
You can freeze these bars for up to 3 months. Wrap them tightly in plastic wrap and then place them in a freezer-safe container or bag. When you’re ready to indulge, just thaw them at room temperature for a few hours, and they’ll taste nearly as fresh as the day you baked them.
Reheating
If you want to enjoy slightly warm Carmelitas, pop a slice in the microwave for 10-15 seconds or warm them gently in a preheated oven at 300°F for 5 minutes. This softens the caramel and chocolate slightly, making them even more mouthwatering.
FAQs
Can I substitute caramel bits with something else?
Absolutely! If you don’t have caramel bits handy, chopped soft caramel candies work great too. Alternatively, you can try butterscotch chips for a slightly different but equally delicious twist.
What type of oats are best for this recipe?
Old-fashioned rolled oats are ideal because they hold their texture well during baking, giving you that perfect chew. Avoid instant or quick oats as they can make the bars too soft or mushy.
Can I make these bars gluten-free?
Yes! Simply substitute the all-purpose flour with a gluten-free baking flour blend that can be used cup-for-cup. Just make sure your oats are certified gluten-free to avoid cross-contamination.
Is it necessary to use unsalted butter?
Using unsalted butter gives you more control over the saltiness of the bars. If you only have salted butter, reduce or omit the added salt in the recipe to keep the flavor balanced.
How thick should the layer of batter be in the pan?
Press half the batter evenly to form a compact base layer—about half an inch thick. This ensures the bars have a sturdy bottom, while the scattered caramel and chocolate between layers create a luscious, gooey texture.
Final Thoughts
If you’re looking for a dessert that’s both simple to make and unbelievably satisfying, The Best Carmelitas Recipe should definitely grace your kitchen. With the perfect mix of caramel, chocolate, oats, and buttery goodness, this recipe will quickly become a cherished classic that you’ll want to bake again and again. So gather your ingredients, invite some friends or just treat yourself, and enjoy every blissful bite of these heavenly bars!
Print
The Best Carmelitas Recipe
- Prep Time: 15 minutes
- Cook Time: 30-35 minutes
- Total Time: 45-50 minutes
- Yield: 12 servings
- Category: Dessert
- Method: Baking
- Cuisine: American
- Diet: Vegetarian
Description
These Carmelitas are irresistibly chewy bars layered with rich caramel, semi-sweet chocolate chips, and old-fashioned oats, all baked to golden perfection. The recipe features a simple yet decadent combination of flavors and textures, perfect for a delicious homemade treat that’s easy to make and share.
Ingredients
Wet Ingredients
- 1 cup unsalted butter, melted
- 1 1/2 cups brown sugar, packed
- 2 large eggs
- 1 teaspoon vanilla extract
Dry Ingredients
- 2 cups all-purpose flour
- 1/2 teaspoon baking powder
- 1/4 teaspoon salt
- 2 cups old-fashioned rolled oats
Add-ins
- 1 cup semi-sweet chocolate chips (plus a small handful for topping)
- 1 cup caramel bits or soft caramel candies, chopped (plus a small handful for topping)
Instructions
- Preheat Oven: Preheat your oven to 350°F (175°C). Grease or line a 9×13-inch baking pan with parchment paper, making sure to leave an overhang to easily lift the bars out once baked.
- Mix Wet Ingredients: In a large bowl, whisk the melted butter and brown sugar together until the mixture is smooth and fully combined, creating a rich base for your batter.
- Add Eggs and Vanilla: Beat in the eggs and vanilla extract thoroughly until well incorporated, which helps bind the ingredients for the perfect texture.
- Combine Dry Ingredients: In a separate bowl, sift together the all-purpose flour, baking powder, and salt to evenly distribute these leavening agents and seasoning.
- Mix Dry into Wet: Gradually add the dry mixture into the wet ingredients, stirring gently until just combined to avoid overmixing and keep the bars tender.
- Fold in Oats and Add-ins: Fold the rolled oats into the batter, then gently stir in the chocolate chips and caramel bits, reserving a small handful of each for sprinkling on top later.
- Layer the Batter: Press half of the batter evenly into the prepared baking pan to form the first layer. Then, sprinkle the reserved chocolate chips and caramel bits evenly over this layer for an extra burst of flavor.
- Add Top Layer: Crumble the remaining batter over the chocolate and caramel topping to form the second layer, ensuring a good coverage without pressing down too hard.
- Bake: Place the pan in the oven and bake for 30-35 minutes, or until the bars are golden brown on top and the caramel is visibly bubbling, indicating perfect meltiness.
- Cool and Serve: Allow the Carmelitas to cool completely in the pan on a wire rack before using the parchment overhang to lift them out and slice into bars. This cooling step helps them set up and hold their shape.
Notes
- Use parchment paper for easy removal and cleanup.
- Letting the bars cool fully ensures clean slicing and prevents crumbling.
- If soft caramel candies are used, chopping them finely helps them melt evenly.
- To make these gluten-free, substitute the all-purpose flour with a gluten-free blend.
- You can substitute semi-sweet chocolate chips with dark or milk chocolate chips according to your preference.


