
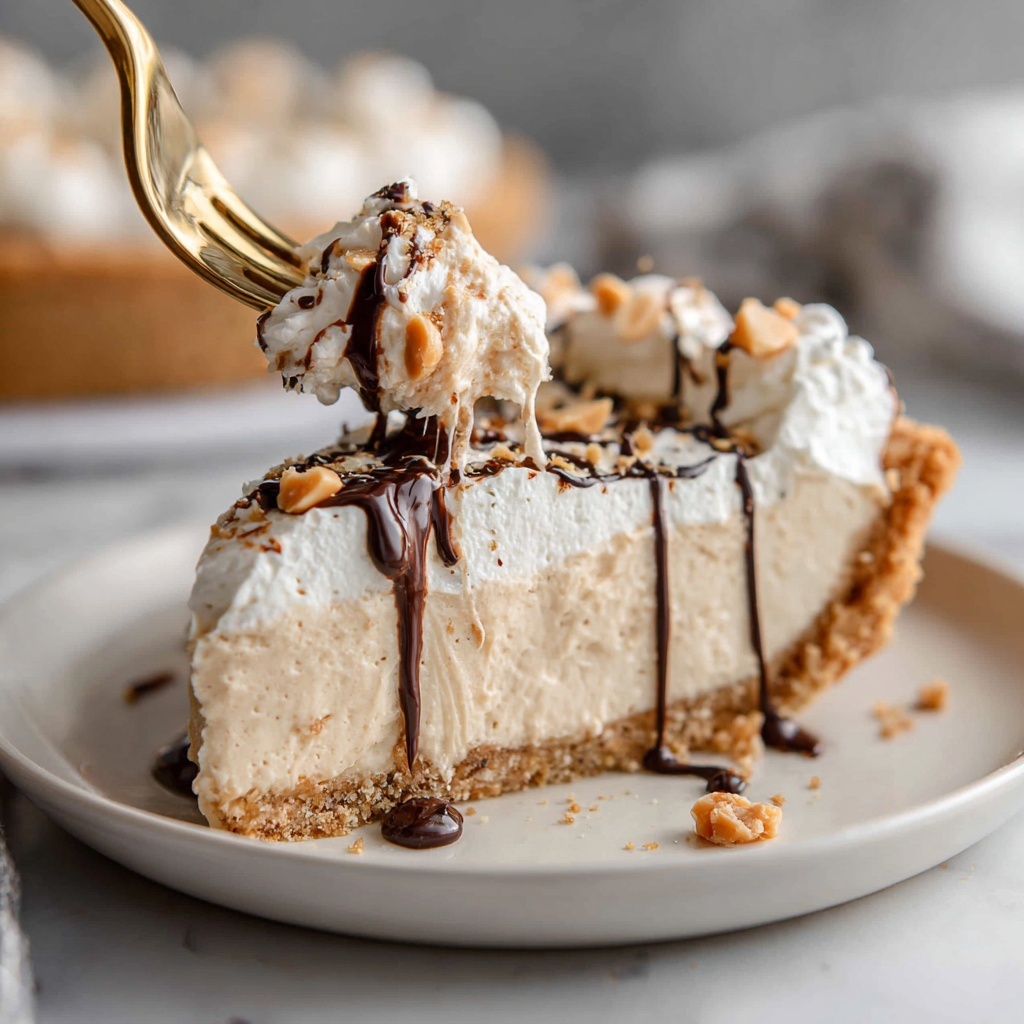
If you are craving a dessert that is irresistibly creamy, buttery, and packed with the rich flavor of peanut butter, this No-Bake Peanut Butter Pie Recipe is about to become your new favorite! This luscious pie brings together a dreamy peanut butter filling nestled in a crisp graham cracker crust, all without ever turning on the oven. Perfect for warm days or last-minute guests, this pie is delightfully simple yet decadently satisfying, making it a true crowd-pleaser that’s as quick to prepare as it is delicious to eat.
Ingredients You’ll Need
Every ingredient in this No-Bake Peanut Butter Pie Recipe plays an important role—whether it’s creating that velvety filling, adding sweetness, or providing the perfect crunchy backdrop. Let’s take a look at these simple but essential components that ensure your pie turns out just right.
- Premade graham cracker pie crust: Provides a buttery and slightly crunchy base that contrasts beautifully with the creamy filling.
- Peanut butter (3/4 cup): Choose a smooth, creamy variety for the richest, silkiest texture and classic peanut butter flavor.
- Cream cheese, softened (4 oz): Adds tangy richness that balances the sweetness and enhances creaminess.
- Confectioners’ sugar (1 cup): Sweetens the filling while dissolving smoothly, avoiding any grainy texture.
- Whipped topping (12 oz total): Lightens the filling to an airy, fluffy consistency, giving the pie its dreamy mouthfeel.
- Chopped salted peanuts (optional): Adds a salty crunch on top, perfect for contrast and added texture.
- Chocolate sauce (optional): A luscious drizzle that brings a hint of decadence and pairs perfectly with peanut butter.
How to Make No-Bake Peanut Butter Pie Recipe
Step 1: Prepare the Peanut Butter Filling
Start by combining the softened cream cheese, creamy peanut butter, and confectioners’ sugar in a large bowl. Use a hand mixer or stand mixer to whip the ingredients together until the mixture is completely smooth and lump-free. This creates the rich base that defines the pie’s luscious flavor and creamy texture.
Step 2: Fold in Whipped Topping
Once your peanut butter mixture is smooth, gently fold in 8 ounces of whipped topping. This step is crucial because it lightens the filling, transforming it into a fluffy, airy delight that makes each bite feel like a cloud of peanut buttery bliss.
Step 3: Assemble the Pie
Pour your finished filling into the premade graham cracker crust, using a spatula to spread it evenly. Make sure to fill every corner for an even distribution of that irresistible peanut buttery goodness, perfectly balanced with the slightly crunchy crust underneath.
Step 4: Add the Whipped Topping Layer
Top your pie with the remaining 4 ounces of whipped topping. Spread it gently but thoroughly for a smooth, even layer that adds a light creaminess to each bite. This topping not only looks gorgeous but also adds a final note of softness against the rich filling.
Step 5: Chill Until Set
Refrigerate your pie for at least 2 hours. This chilling period is essential to let the filling firm up and the flavors meld together, ensuring every slice holds its shape and delivers a perfectly balanced taste.
Step 6: Garnish and Serve
Just before serving, add your chopped salted peanuts and a drizzle of chocolate sauce if you like an extra layer of indulgence. These garnishes add texture and visual appeal, making your No-Bake Peanut Butter Pie Recipe as stunning as it is tasty. Slice, serve chilled, and watch your guests fall in love!
How to Serve No-Bake Peanut Butter Pie Recipe

Garnishes
For garnishes, the combination of chopped salted peanuts and chocolate sauce is a classic match that takes this pie to another level. The peanuts add a satisfying crunch and a touch of savory contrast, while the chocolate sauce offers an extra dose of sweetness that complements the peanut butter flawlessly. You can also consider whipped cream rosettes or a sprinkle of cocoa powder for a different but equally delicious touch.
Side Dishes
Serving this pie alongside fresh fruit like sliced bananas or strawberries brightens the richness and adds a refreshing contrast. A simple cup of black coffee or a glass of cold milk pairs beautifully for a comforting dessert experience that balances sweet and savory flavors perfectly.
Creative Ways to Present
Want to impress your guests? Try serving individual slices in clear dessert glasses layered with extra whipped topping and chopped peanuts on top. Alternatively, create mini versions using pre-made tart shells for personalized servings. However you present it, the creamy peanut butter filling is always the star that wins everyone’s heart.
Make Ahead and Storage
Storing Leftovers
Your No-Bake Peanut Butter Pie Recipe stores wonderfully in the refrigerator. Cover it tightly with plastic wrap or place it in an airtight container to keep it fresh and prevent it from absorbing other fridge odors. It will stay deliciously creamy for up to 3 days, making it a perfect make-ahead dessert for busy schedules.
Freezing
You can freeze leftover pie if needed. Wrap the pie securely in plastic wrap and then aluminum foil to protect it from freezer burn. Freeze for up to one month. When ready to eat, thaw overnight in the fridge. The texture may be slightly different but still very enjoyable.
Reheating
Since this pie is best served chilled, reheating is not recommended. Instead, allow frozen or refrigerated slices to come to a comfortable, cool temperature before serving for the best taste and texture experience. The creamy filling is at its best when cool and smooth.
FAQs
Can I use crunchy peanut butter instead of smooth?
Yes, you can! Using crunchy peanut butter will add extra texture to the filling, giving it a bit more crunch. Just keep in mind that this might alter the overall creaminess slightly, but it’s a delicious variation if you love that peanut crunch throughout your pie.
Is it possible to make the pie gluten-free?
Absolutely! Just use a gluten-free graham cracker crust or another gluten-free crust base. The rest of the ingredients are naturally gluten-free, so this No-Bake Peanut Butter Pie Recipe is easily adaptable for gluten-sensitive friends and family.
Can I substitute the cream cheese with something else?
The cream cheese is key for the pie’s tangy richness and thick texture, but if necessary, you could try using mascarpone or a full-fat Greek yogurt as alternatives. Just note that these substitutions may slightly change the flavor and consistency.
How long does the pie need to chill before serving?
For the best results, chill your pie for at least 2 hours. This ensures the filling sets up nicely and the flavors meld perfectly. If you’re pressed for time, a minimum of one hour can work, but the texture won’t be quite as firm.
Can I double the recipe for a larger crowd?
Yes, doubling the recipe is straightforward and perfect for sharing. Just make sure you have a larger pie crust or two crusts ready. Mixing the filling ingredients in a bigger bowl makes the process just as easy, and you’ll have plenty to go around!
Final Thoughts
If you love peanut butter and crave an easy yet impressive dessert, this No-Bake Peanut Butter Pie Recipe is your go-to solution. It’s unbelievably quick to put together, requires only a handful of everyday ingredients, and tastes like a gourmet treat. I’m confident once you try it, you’ll want to keep this recipe on hand for all your special occasions and cozy nights alike. Happy baking, or should I say, happy no-baking!
Print
No-Bake Peanut Butter Pie Recipe
- Prep Time: 15 minutes
- Cook Time: 0 minutes
- Total Time: 2 hours 15 minutes
- Yield: 8 servings
- Category: Dessert
- Method: No-Cook
- Cuisine: American
- Diet: Vegetarian
Description
This No-Bake Peanut Butter Pie is a creamy, rich dessert that combines the classic flavors of peanut butter and cream cheese in a smooth, fluffy filling nestled inside a crunchy graham cracker crust. Easy to prepare and chilled until set, it’s perfect for warm days or when you want a delicious treat without turning on the oven.
Ingredients
Pie Crust
- 1 premade graham cracker pie crust
Filling
- 3/4 cup peanut butter
- 4 oz cream cheese, softened
- 1 cup confectioners’ sugar
- 8 oz whipped topping (such as Cool Whip)
Topping
- 4 oz whipped topping
- Chopped salted peanuts (optional, for garnish)
- Chocolate sauce (optional, for garnish)
Instructions
- Prepare Filling: In a large bowl, combine the softened cream cheese, peanut butter, and confectioners’ sugar. Whip the mixture until it is smooth and well blended, ensuring no lumps remain.
- Fold in Whipped Topping: Gently fold in 8 oz of whipped topping into the peanut butter mixture. Mix until all ingredients are well incorporated and the filling is light and airy.
- Assemble Pie: Pour the prepared filling into the premade graham cracker pie crust. Use a spatula to spread the filling evenly, filling the crust completely.
- Add Topping: Spread the additional 4 oz of whipped topping evenly over the top of the filled pie. Smooth the topping to the edges to create an even layer.
- Chill: Place the pie in the refrigerator and chill for at least 2 hours to allow the filling to set and the flavors to develop.
- Garnish and Serve: Before serving, top the pie with chopped salted peanuts and a drizzle of chocolate sauce, if desired. Slice and serve chilled.
Notes
- Use softened cream cheese for easier mixing and smoother filling.
- Folding in the whipped topping gently preserves its fluffiness, preventing the filling from becoming dense.
- For best results, chill the pie for at least 2 hours but overnight chilling will enhance firmness and flavor.
- Optional garnishes like chopped salted peanuts and chocolate sauce add texture and complementary flavors.
- If you prefer a different crust, graham cracker crust alternatives such as Oreo crust can also be used.

