
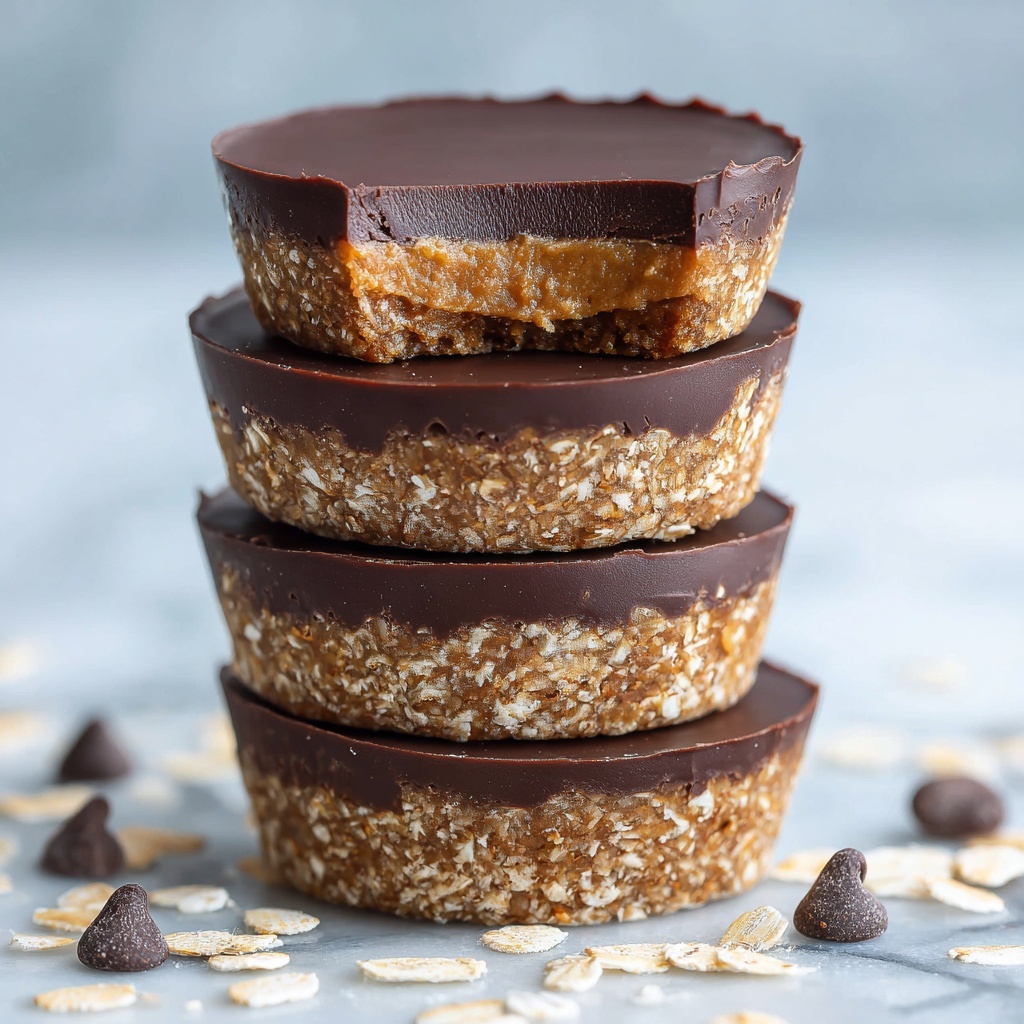
If you are craving a delightfully satisfying treat that brings together the comforting flavors of peanut butter, oats, and chocolate without turning on your oven, you have found your new favorite in this No Bake Peanut Butter Oat Cups Recipe. These cups are a perfect blend of chewy oats, creamy peanut butter, and a luscious chocolate top that sets into a dreamy, snackable bite. Whether you need a quick bite to fuel your afternoon or a homemade dessert that feels indulgent but wholesome, these little cups check all the boxes. Plus, they come together with ease, making them a go-to for busy days or when you’re just craving that sweet, nutty goodness.
Ingredients You’ll Need
This No Bake Peanut Butter Oat Cups Recipe calls for a short list of pantry staples, each playing an important role in flavor, texture, and ease. From creamy peanut butter that provides richness and protein to rolled oats lending heartiness and chew, these ingredients work in harmony to create that perfect bite.
- 2 cups old fashioned rolled oats: The chewy base that adds texture and a wholesome touch to every cup.
- 1 cup creamy peanut butter: Provides creamy, nutty flavor and binds everything together beautifully.
- 1/2 cup honey or maple syrup: Natural sweetness that also helps to hold the oats in place.
- 1/3 cup melted coconut oil: Adds healthy fats and helps the mixture firm up once chilled.
- 1 teaspoon vanilla extract: Enhances sweetness and adds a lovely aromatic depth.
- 1/4 teaspoon salt: A pinch to balance sweetness and intensify the flavors.
- 3/4 cup semi sweet chocolate chips: Melts into a glossy, rich topping that makes every bite irresistible.
How to Make No Bake Peanut Butter Oat Cups Recipe
Step 1: Prepare Your Pan
Start by lining a 12-cup muffin pan with paper liners or giving it a light spray of nonstick cooking spray. This little prep step ensures easy removal later, so your No Bake Peanut Butter Oat Cups hold their shape perfectly without sticking.
Step 2: Mix the Wet Ingredients
In a large bowl, combine the creamy peanut butter, honey or maple syrup, melted coconut oil, vanilla extract, and salt. Stir them together until the mixture turns smooth and glossy, as this will make sure every oat piece gets plenty of love and moisture.
Step 3: Fold in the Oats
Gently fold the rolled oats into the wet mixture, making sure they are evenly coated. This step is where your cups start taking shape, blending chewy oats with the silky peanut butter blend.
Step 4: Press into Muffin Cups
Divide the oat mixture evenly among the muffin cups. Press down firmly with the back of a spoon to compact the mixture—it helps your cups hold together once chilled and sets a nice base for the chocolate topping.
Step 5: Add the Chocolate Topping
Melt the semi sweet chocolate chips in a microwave-safe bowl using 20-second intervals, stirring in between until completely smooth and shiny. Spoon the melted chocolate over each cup and spread it evenly, creating a shiny, indulgent top layer.
Step 6: Chill Until Firm
Place the pan in the refrigerator for at least one hour to let the cups set. Once firm, you can easily peel away the liners and enjoy that perfect balance of chewy and creamy in every bite.
How to Serve No Bake Peanut Butter Oat Cups Recipe

Garnishes
While these cups shine on their own, adding a sprinkle of crushed peanuts or a pinch of flaky sea salt atop the chocolate before it sets adds texture and an extra flavor kick. You could also dust a little cocoa powder or drizzle extra peanut butter for a fancy finish.
Side Dishes
Pair these cups with a refreshing fruit salad or a cup of your favorite coffee or tea. They also make a fantastic treat alongside Greek yogurt or fresh berries for a balanced and indulgent snack experience.
Creative Ways to Present
If you want to impress friends or family, serve these No Bake Peanut Butter Oat Cups Recipe bites on a rustic wooden board with small bowls of additional peanut butter, chocolate chips, and chopped nuts for a fun DIY topping station. They also look adorable in mini cupcake liners when serving at parties or gatherings.
Make Ahead and Storage
Storing Leftovers
Keep your peanut butter oat cups fresh by storing them in an airtight container in the refrigerator. They will maintain their flavor and texture for up to one week, making them a convenient snack you can grab anytime.
Freezing
These cups freeze beautifully! Place them in a single layer on a baking sheet to freeze solid, then transfer to a freezer-safe bag or container. They can be frozen for up to 3 months and thawed overnight in the fridge for a quick snack or unexpected dessert.
Reheating
No reheating needed here; simply allow frozen cups to thaw in the refrigerator. If you prefer a softer texture, let them sit at room temperature for 10-15 minutes before serving.
FAQs
Can I use crunchy peanut butter instead of creamy?
Absolutely! Using crunchy peanut butter will add a delightful extra texture to your oat cups, giving a slight crunch with every bite. Just keep in mind the mixture may be less smooth but still delicious.
Is it possible to make this recipe vegan?
Yes! Swap the honey for pure maple syrup to ensure the recipe is fully vegan. All other ingredients are plant-based, making these the perfect vegan no bake treat.
Can I substitute the coconut oil with another fat?
If you do not have coconut oil, unsalted butter or a neutral oil like vegetable oil can work in a pinch, but coconut oil adds a nice subtle flavor and firmness when chilled, so it’s the best choice here.
How do I make sure the chocolate topping doesn’t melt when serving?
For best results, serve the cups chilled or at room temperature away from direct sunlight or heat. The chocolate should stay solid if kept cool, especially since it’s only a thin layer on top.
What if I want to add nuts or dried fruit?
Feel free! Stir chopped nuts or dried fruits like raisins or cranberries into the oat mixture before pressing into cups. This adds both flavor and texture to your No Bake Peanut Butter Oat Cups Recipe creations.
Final Thoughts
This No Bake Peanut Butter Oat Cups Recipe is such a fun, easy, and utterly delicious way to satisfy your sweet tooth without much fuss. It’s perfect for busy days, kids’ snacks, or whenever peanut butter and chocolate cravings strike. Give this recipe a try—you might just find it becoming your go-to homemade treat that feels both indulgent and nourishing.
Print
No Bake Peanut Butter Oat Cups Recipe
- Prep Time: 15 minutes
- Cook Time: 0 minutes
- Total Time: 1 hour 15 minutes
- Yield: 12 cups
- Category: Dessert
- Method: No-Cook
- Cuisine: American
- Diet: Vegetarian
Description
These No Bake Peanut Butter Oat Cups are a delicious and easy-to-make treat combining creamy peanut butter, rolled oats, and a touch of sweetness from honey or maple syrup, topped with melted semi-sweet chocolate. Perfect as a healthy snack or quick dessert, these cups require no baking and set firmly in the refrigerator.
Ingredients
Dry Ingredients
- 2 cups old fashioned rolled oats
- 1/4 teaspoon salt
- 3/4 cup semi sweet chocolate chips
Wet Ingredients
- 1 cup creamy peanut butter
- 1/2 cup honey or maple syrup
- 1/3 cup melted coconut oil
- 1 teaspoon vanilla extract
Instructions
- Prepare pan: Line a 12-cup muffin pan with paper liners or lightly grease it with nonstick spray to ensure easy removal of the cups.
- Mix wet ingredients: In a large bowl, thoroughly stir together the peanut butter, honey or maple syrup, melted coconut oil, vanilla extract, and salt until the mixture is smooth and homogenous.
- Combine oats: Fold the rolled oats into the peanut butter mixture, ensuring all oats are fully coated and the mixture is evenly combined.
- Fill cups: Divide the oat mixture evenly among the muffin cups, pressing down firmly with the back of a spoon to compact the mixture for better texture and shape retention.
- Melt chocolate: Place the semi sweet chocolate chips in a microwave-safe bowl and melt in 20-second intervals, stirring between each until completely smooth.
- Top cups: Spoon the melted chocolate over each oat cup and spread it evenly to cover the tops, creating a delicious chocolate layer.
- Chill: Refrigerate the muffin pan for at least 1 hour or until the cups are firm to the touch.
- Serve and store: Once firm, remove the peanut butter oat cups from the pan and store them in the refrigerator until ready to serve. They can be kept for up to one week or frozen for longer storage.
Notes
- Using natural peanut butter results in a softer texture, while traditional peanut butter yields firmer cups.
- For a gluten-free version, ensure the rolled oats are certified gluten free.
- Store the cups refrigerated for up to one week or freeze them for extended freshness.
