
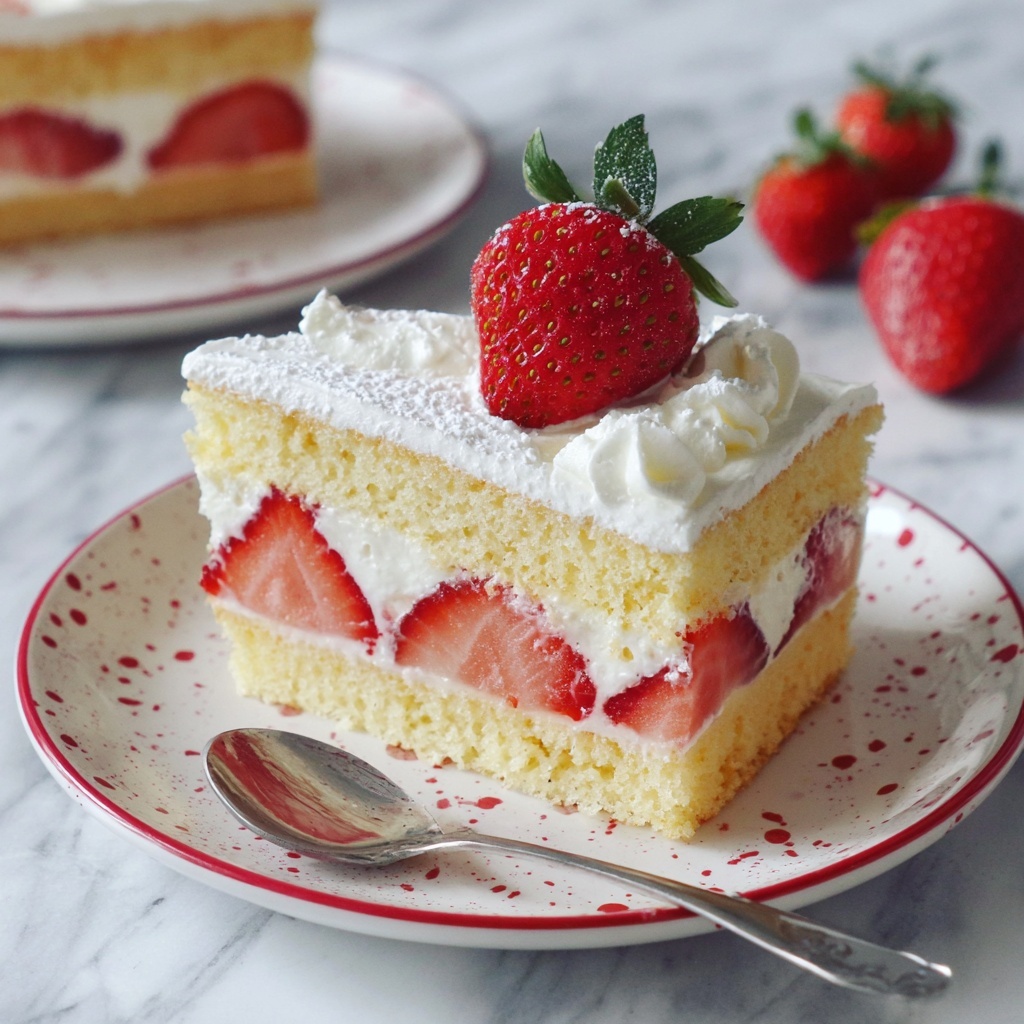
If you’ve ever dreamed of biting into a cake that feels as light as a cloud and bursts with fresh, fruity sweetness, then this Japanese Strawberry Cake Recipe is exactly what you need in your life. This iconic dessert perfectly balances airy sponge, luscious whipped cream, and vibrant strawberries for a treat that’s as beautiful as it is delicious. It’s a celebration of simplicity and elegance, creating a dessert that feels like a gentle hug from a dear friend. Let me take you through every step so you can recreate this classic masterpiece at home with joy and confidence.
Ingredients You’ll Need
The magic of this Japanese Strawberry Cake Recipe lies in its straightforward, yet thoughtfully chosen ingredients. Each element plays a crucial role—from the tender cake flour giving the sponge its delicate texture to the fresh strawberries adding bursts of sweetness and color. Get ready to gather a handful of essentials that come together to create pure magic!
- Whole milk (80 g / 1/3 cup): Adds moisture and richness to the batter for a tender crumb.
- Unsalted butter (50 g / 3 1/2 tablespoons): Supports buttery flavor and keeps the cake moist without overpowering.
- Cake flour (75 g / 1/2 cup + 1/2 tablespoon): Provides the perfect fine texture essential for Japanese-style sponge cakes.
- Large egg yolks (4): Bring richness and help bind the batter seamlessly.
- Large egg whites (4): Whipped into glossy peaks, they give the cake its iconic light and airy structure.
- Sugar (70 g / 5 1/2 tablespoons; plus additional for soaking and syrup): Sweetens the cake and helps stabilize the meringue.
- Fresh strawberries (12 oz to 1 lb / 340 g to 450 g, divided): The star of the show, providing juicy flavor and vibrant color throughout.
- Heavy whipping cream (280 g / 10 oz): Whipped to fluffy perfection for the luscious frosting layers.
- Confectioners sugar (2 tablespoons): Sweetens the cream delicately without graininess.
- Gelatin (3/4 teaspoon, optional): Helps stabilize the whipped cream if you want a firmer finish for decorating or longer storage.
- Cold water (2 tablespoons, optional): For blooming gelatin to ensure smooth incorporation.
- Hot water (3 tablespoons): Used to dissolve sugar for the soaking syrup that keeps layers moist and flavorful.
How to Make Japanese Strawberry Cake Recipe
Step 1: Prepare the Cake Pan
Start by lining the bottom of an 8-inch round cake pan with parchment paper. This prevents sticking and helps achieve a smooth release. Preheat your oven to a gentle 325°F (160°C). Get a larger high-walled pan ready for a water bath, which ensures the cake bakes evenly and stays wonderfully moist. If you use a springform pan, wrapping the outside with foil is a simple trick to avoid any leaks during baking.
Step 2: Make the Batter
Combine milk and butter in a microwave-safe bowl until melted, then sift in the cake flour and mix gently. Add the egg yolks and stir until the batter becomes smooth and cohesive. This silky mixture forms the rich base of your cake and guarantees a soft and tender crumb.
Step 3: Beat the Egg Whites
Whipping the egg whites correctly is the secret to that famous fluffy texture. Beat them at medium-high speed until frothy, then gradually add sugar while continuing to beat until you get glossy, medium peaks. The delicate balance of air incorporated here will lift your cake to cloud-like heights.
Step 4: Combine Mixtures
Carefully fold one-quarter of the whipped egg whites into the yolk batter to lighten it. Then fold this mixture gently back into the remaining whites, ensuring you don’t deflate all that precious air. This folding step is key to maintaining a feather-light sponge.
Step 5: Bake
Pour the batter into your prepared pan, tap it lightly to release any large air bubbles, then nestle it into the water bath. The gentle steam from the water prevents the cake from drying out or cracking. Bake for about 1 hour and 30 minutes, until the cake is set and a skewer inserted comes out clean. Once done, cool it completely on a rack to prepare for assembly.
Step 6: Macerate Strawberries
Take about half of your strawberries, slice them, and toss with 1 1/2 teaspoons of sugar. Let them sit for 1 to 2 hours. This pulls natural juices from the fruit, ensuring juicy, sweet layers that meld beautifully with the cream and sponge.
Step 7: Make Syrup
Dissolve 2 tablespoons of sugar in 3 tablespoons of hot water, and for an extra touch of magic, whisk in a bit of the reserved strawberry juice. This syrup will soak into your cake layers, making each bite delightfully moist and full of flavor.
Step 8: Prepare Whipped Cream
Whip the heavy cream with sifted confectioners sugar until firm peaks form. For a stabilized cream that holds its shape beautifully, bloom gelatin in cold water, melt it gently, then add it to softly whipped cream before finishing whipping to soft peaks. This option is perfect if you want your cake to last or for professional-looking decorations.
Step 9: Slice and Soak Cake Layers
Once completely cooled, slice off the browned cake top for an even surface, then carefully cut the cake into two equal layers with a serrated knife. Brush each exposed surface generously with your homemade syrup to keep everything moist and flavorful.
Step 10: Assemble Layers
Place the bottom layer on your cake stand or plate, spread a thin layer of whipped cream, and top with the juicy macerated strawberries. Add another layer of whipped cream, then gently place the second cake layer on top and brush it with syrup as well. This layering creates a beautiful balance of textures and flavors.
Step 11: Frost and Decorate
Apply a thin crumb coat of whipped cream all over the cake to lock in crumbs, then spread a thicker, even layer for a smooth finish. Use any leftover cream in a piping bag to add pretty decorations on top, and finish with whole or halved strawberries placed aesthetically. This step turns your cake into a stunning centerpiece.
Step 12: Chill and Serve
If you’re using stabilized cream, refrigerate your cake uncovered for at least 30 minutes before serving to set the frosting beautifully. Otherwise, it’s best enjoyed immediately or within a few hours. Slice at room temperature to truly appreciate the soft texture and flavors harmonizing perfectly.
How to Serve Japanese Strawberry Cake Recipe

Garnishes
For a touch of elegance, fresh mint leaves or a light dusting of confectioners sugar complement the strawberries beautifully. You can also add small edible flowers for a charming, whimsical appearance that’s sure to impress your guests.
Side Dishes
This cake pairs wonderfully with a scoop of vanilla bean ice cream or a refreshing green tea panna cotta. The subtle flavors on the side enhance without overpowering the delicate sweetness and creaminess of the strawberry cake.
Creative Ways to Present
Try layering individual portions in clear glass jars for beautiful mini trifles or use strawberry slices to create pretty patterns on top of the cream. You can even serve slices with a drizzle of strawberry coulis for an extra berry burst that will make every bite sparkle.
Make Ahead and Storage
Storing Leftovers
Keep your strawberry cake covered loosely in the refrigerator to preserve the freshness of the whipped cream and fruit. It’s best enjoyed within 2 days for optimal flavor and texture, as strawberries can release moisture and soften the cake layers over time.
Freezing
Freezing is possible but tricky with whipped cream and fresh fruit. If you want to freeze, wrap the cake tightly with plastic wrap and foil to protect it from freezer burn, and consume within 1 month. Thaw overnight in the fridge and note the texture of the cream might change slightly.
Reheating
This cake is best enjoyed chilled or at room temperature and is not suited for reheating. Allow refrigerated cake to sit out for about 30 minutes to soften slightly before serving to recapture that soft, melt-in-your-mouth experience.
FAQs
Can I use frozen strawberries for this Japanese Strawberry Cake Recipe?
While fresh strawberries are recommended for the best texture and flavor, frozen strawberries can be used if fresh ones are unavailable. Be sure to thaw and drain them well to avoid excess moisture affecting your cake’s texture.
What is the purpose of the water bath when baking this cake?
The water bath creates a gentle, moist baking environment that prevents the cake from drying out or cracking, ensuring that your sponge stays tender and evenly baked throughout the long baking time.
Why is gelatin optional in the whipped cream?
Gelatin stabilizes the whipped cream, helping it hold its shape longer and making it easier to pipe decorations. If you plan to serve the cake quickly, you can skip it for a lighter, more delicate cream.
Can this Japanese Strawberry Cake Recipe be made gluten-free?
Yes, by substituting the cake flour with a fine gluten-free flour blend that measures the same, you can adapt this recipe. Just ensure the blend has good baking properties to maintain the delicate sponge texture.
How do I prevent the cake from becoming soggy with all the syrup and cream?
Applying the syrup sparingly and allowing each layer to set before adding cream helps prevent sogginess. Also, chilling the assembled cake helps the layers absorb moisture evenly without becoming mushy.
Final Thoughts
This Japanese Strawberry Cake Recipe is truly a treasure to have in your baking repertoire. It brings together simplicity, elegance, and delightful flavors in a way that captivates both the eyes and the palate. I encourage you to give it a try—once you experience the light sponge, creamy layers, and juicy strawberries working together, you’ll want to make it for every special occasion or whenever you need a slice of happiness.
Print
Japanese Strawberry Cake Recipe
- Prep Time: 30 minutes
- Cook Time: 1 hour 30 minutes
- Total Time: 3 hours 30 minutes
- Yield: 8 servings
- Category: Dessert
- Method: Baking
- Cuisine: Japanese
- Diet: Vegetarian
Description
This Japanese Strawberry Cake is a delicate, airy sponge cake layered with macerated strawberries and lightly sweetened whipped cream, creating a light yet indulgent dessert. The cake is baked gently in a water bath to achieve a moist, soft texture and decorated with fresh strawberries for a classic, elegant presentation perfect for celebrations or a special treat.
Ingredients
Cake
- 80 g (1/3 cup) whole milk
- 50 g (3 1/2 tablespoons) unsalted butter
- 75 g (1/2 cup + 1/2 tablespoon) cake flour
- 4 large egg yolks
- 4 large egg whites
- 70 g (5 1/2 tablespoons) sugar (caster sugar if available)
Strawberries
- 12 oz to 1 lb (340 g to 450 g) strawberries, divided
- 1 1/2 teaspoons sugar
Syrup
- 2 tablespoons sugar
- 3 tablespoons hot water
- Optional: reserved strawberry juice
Whipped Cream
- 280 g (10 oz) heavy whipping cream
- 2 tablespoons confectioners sugar
- 3/4 teaspoon gelatin (optional, for stabilized cream)
- 2 tablespoons cold water (optional, for gelatin)
Instructions
- Prepare the Cake Pan: Line the bottom of an 8-inch round cake pan with parchment paper. Preheat the oven to 325°F (160°C). Prepare a high-walled pan or baking dish to use as a water bath for gentle, even baking. If using a springform or removable-bottom pan, wrap it in foil to prevent leaks.
- Make the Batter: In a medium heatproof bowl, combine the milk and butter and microwave until melted. Stir thoroughly. Sift in the cake flour and gently mix. Add the egg yolks and mix until the batter is smooth and cohesive.
- Beat the Egg Whites: In a clean bowl, beat the egg whites with an electric mixer on medium-high speed until frothy. Gradually add the sugar and continue beating until glossy medium peaks form.
- Combine Mixtures: Gently fold one quarter of the whipped egg whites into the yolk batter to lighten it. Then pour this mixture back into the remaining egg whites and fold gently until just combined, being careful not to overmix to retain airiness.
- Bake: Pour the batter into the prepared cake pan and gently tap to release large air bubbles. Place the cake pan in the water bath, ensuring hot water reaches about one inch up the side of the cake pan. Bake for 1 hour and 30 minutes or until the cake is set and a skewer inserted in the center comes out clean. Cool the cake completely on a rack.
- Macerate Strawberries: While the cake cools, slice approximately 8 oz (225 g) of strawberries and toss with 1 1/2 teaspoons sugar. Let them sit for 1 to 2 hours until juicy. Reserve any juice released for syrup or additional flavoring.
- Make Syrup: Dissolve 2 tablespoons of sugar into 3 tablespoons of hot water. Optionally, whisk in some reserved strawberry juice to enhance flavor.
- Prepare Whipped Cream: For regular whipped cream, beat the heavy cream with sifted confectioners sugar until firm peaks form. For stabilized whipped cream, first bloom gelatin in cold water, melt it gently, then add to the cream when it reaches soft peaks and whip to soft peaks again.
- Slice and Soak Cake Layers: Once cooled, trim off the browned top of the cake. Using a serrated knife, carefully cut the cake horizontally into two even layers. Brush both cut surfaces generously with the prepared cake syrup.
- Assemble Layers: Place the bottom layer on a cake stand. Spread a thin layer of whipped cream over it, then evenly distribute the sliced macerated strawberries on top. Add another layer of whipped cream over the strawberries. Place the second cake layer over this and brush with more syrup.
- Frost and Decorate: Apply a thin crumb coat layer of whipped cream over the whole cake to lock in crumbs. Then cover with a thicker layer of cream. Use any remaining whipped cream in a piping bag to decorate the cake edges or top and garnish with reserved whole or halved strawberries.
- Chill and Serve: If using stabilized cream, refrigerate the cake uncovered for at least 30 minutes to set. Otherwise, serve immediately or within a few hours. For best texture, slice and enjoy at room temperature.
Notes
- Wrapping the cake pan with foil prevents water from leaking into the batter during the water bath baking.
- Using a water bath ensures gentle, even baking to achieve the cake’s signature light and moist texture.
- For more stable whipped cream decorations, use gelatin but this step is optional.
- Macerating strawberries ahead of time enhances their sweetness and juiciness, adding flavor and moisture to the filling.
- Serve the cake at room temperature to best enjoy its delicate texture and flavor.
- If you prefer, you can substitute caster sugar with fine granulated sugar where caster sugar is not available.


