
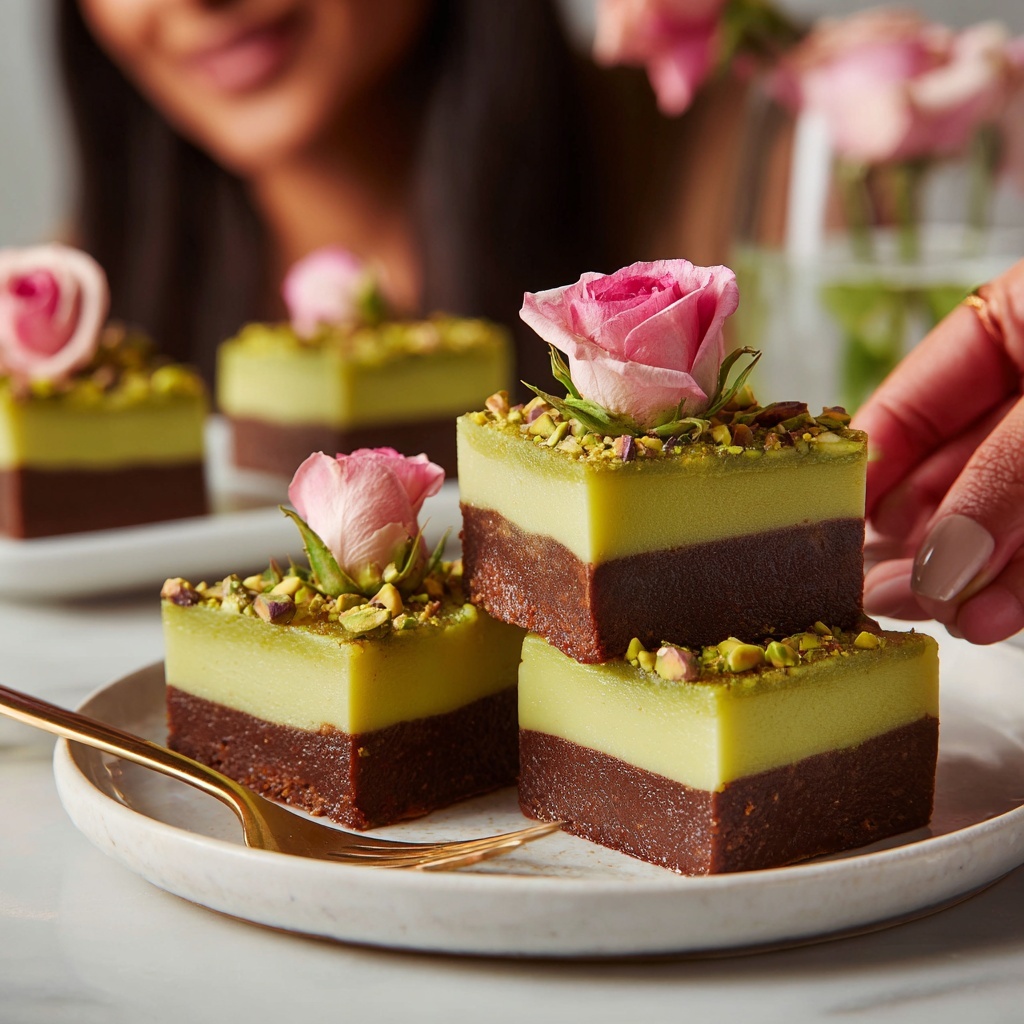
If you’ve been searching for that perfect treat to delight your taste buds without gluten, let me introduce you to the Gluten-Free Pistachio Rosewater Brownies Recipe. These rich and luscious brownies marry the deep, comforting flavors of cocoa and dark chocolate with the exotic floral hint of rosewater. Crunchy pistachios add a delightful texture and nutty note that elevates every bite. Whether you crave a decadent dessert or a sweet snack, these brownies will quickly become a cherished favorite in your baking repertoire.
Ingredients You’ll Need
Gathering ingredients for the Gluten-Free Pistachio Rosewater Brownies Recipe is refreshingly simple. Each ingredient is thoughtfully chosen to enhance flavor, texture, or nutritional value, making the baking process smooth and satisfying.
- 1/2 cup coconut oil or unsalted butter, melted: Adds rich moisture and a subtly sweet undertone.
- 3/4 cup coconut sugar or brown sugar: Brings natural sweetness with a gentle caramel flavor.
- 1/4 cup maple syrup: Offers a glossy texture and depth of sweetness.
- 2 large eggs: Provide structure and bind the ingredients perfectly.
- 1 teaspoon vanilla extract: Enhances overall flavor with a warm, familiar note.
- 1 teaspoon rosewater: Infuses a delicate floral aroma, making these brownies unique.
- 1/2 cup almond flour: A gluten-free base that’s tender and slightly nutty.
- 1/4 cup cocoa powder: Delivers rich chocolate intensity without overpowering.
- 1/2 teaspoon baking soda: Helps the brownies rise just enough for a soft crumb.
- 1/4 teaspoon salt: Balances and elevates all the sweet flavors.
- 1/2 cup dark chocolate chips: Melt into pockets of gooey, bittersweet joy.
- 1/3 cup chopped pistachios, plus extra for topping: Adds crunch and that signature pistachio flavor burst.
How to Make Gluten-Free Pistachio Rosewater Brownies Recipe
Step 1: Preheat and Prepare Your Pan
Get your oven warmed up to 350°F (175°C). While it heats, line an 8×8-inch baking dish with parchment paper to ensure your brownies come out sleek and clean without sticking.
Step 2: Mix the Wet Ingredients
In a large bowl, whisk together your melted coconut oil (or butter), coconut sugar, and maple syrup. The goal here is a smooth, unified base that will make your brownies wonderfully moist and flavorful.
Step 3: Add Eggs and Flavorings
Now, whisk in the two eggs along with the vanilla extract and that magical rosewater. The eggs provide the structure, while the rosewater offers an exotic twist you won’t find in traditional brownies.
Step 4: Incorporate the Dry Ingredients
Sift in the almond flour, cocoa powder, baking soda, and salt. This step is vital to avoid clumps and ensure even distribution of flavors. Gently stir until just combined — overmixing can toughen your brownies, so keep it light.
Step 5: Fold in Mix-Ins
Here’s where the fun really happens: fold in the dark chocolate chips and chopped pistachios, ensuring every bite will have melty chocolate and a satisfying crunch. It’s these little surprises that take your brownies from good to unforgettable.
Step 6: Bake to Perfection
Pour the batter into your prepared pan, smoothing it out evenly. Sprinkle extra chopped pistachios on top for a garnish that looks as great as it tastes. Bake for 22 to 25 minutes, checking so that the center is set but still fudgy — just the way brownies should be.
Step 7: Cool and Slice
Once baked, patience is key. Let the brownies cool completely before slicing into nine generous squares. Cooling allows the flavors to settle and ensures clean cuts that hold together beautifully.
How to Serve Gluten-Free Pistachio Rosewater Brownies Recipe

Garnishes
For an extra touch of elegance, dust your brownies lightly with powdered sugar or a drizzle of melted dark chocolate. Fresh edible rose petals or a sprinkle of crushed pistachios add both visual appeal and a hint of freshness.
Side Dishes
Pair these brownies with a scoop of vanilla or rosewater-infused ice cream to complement their floral and nutty profile. A cup of fragrant green tea or a lavender latte also pairs wonderfully, balancing rich sweetness with subtle herbal notes.
Creative Ways to Present
Transform these brownies into charming dessert bars for a party by cutting them smaller and serving on decorative trays with tiny spoons. For a fancy twist, layer brownie chunks in parfait glasses with whipped cream and chopped pistachios—instant wow factor!
Make Ahead and Storage
Storing Leftovers
Once cooled, keep your brownies in an airtight container at room temperature for up to three days to retain their moistness and flavor. If your kitchen is warm, refrigeration helps maintain freshness, though it may slightly firm the brownies.
Freezing
These brownies freeze beautifully either whole or pre-sliced. Wrap them tightly in plastic wrap and place them in a freezer-safe bag. They’ll keep well for up to two months. Just thaw overnight in the fridge for best texture.
Reheating
To enjoy warm brownies, microwave individual portions for about 15 seconds or reheat slices in a low oven (around 300°F) for 5-7 minutes. This brings back that delightful gooeyness and raises the chocolate aroma.
FAQs
Can I substitute almond flour with another gluten-free flour?
Yes, you can use other nut flours like hazelnut or cashew, but keep in mind that almond flour provides a delicate texture and mild nutty flavor that complements the pistachios perfectly. Gluten-free flour blends are also an option but may alter the texture slightly.
Is rosewater necessary in this recipe?
Rosewater adds a unique floral note that sets these brownies apart, but if you don’t have it, you can omit it or substitute with a tiny bit of orange blossom water for a different but equally lovely aroma.
Can I make these brownies vegan?
To make a vegan version, substitute eggs with flax eggs (1 tablespoon ground flaxseed mixed with 3 tablespoons water per egg) and use melted coconut oil instead of butter. The texture will be slightly different but still delicious.
What kind of chocolate chips work best?
Dark chocolate chips with at least 60-70% cocoa content work best here. They balance the sweetness and complement the rosewater and nutty flavors. Semi-sweet chips are also fine if you prefer sweeter brownies.
How can I make these brownies more fudgy or cakey?
For fudgier brownies, reduce baking time slightly and consider adding a touch more coconut oil. For cakey brownies, add a tablespoon of gluten-free flour and bake a bit longer to get a more structured crumb.
Final Thoughts
There is something truly special about the Gluten-Free Pistachio Rosewater Brownies Recipe that makes it a standout in the gluten-free dessert world. Bursting with flavor, texture, and a hint of floral sophistication, these brownies are easy to make and impossible to forget. I can’t wait for you to try them and see how this delightful combination brings a smile to your friends and family every time.
Print
Gluten-Free Pistachio Rosewater Brownies Recipe
- Prep Time: 10 minutes
- Cook Time: 25 minutes
- Total Time: 35 minutes
- Yield: 9 brownies
- Category: Dessert
- Method: Baking
- Cuisine: American
- Diet: Gluten Free
Description
These Gluten-Free Pistachio Rosewater Brownies combine rich cocoa and dark chocolate chips with a subtle floral hint from rosewater and the crunch of pistachios. Made with almond flour and natural sweeteners, they’re a decadent yet gluten-free treat perfect for dessert or a special snack.
Ingredients
Wet Ingredients
- 1/2 cup coconut oil or unsalted butter, melted
- 3/4 cup coconut sugar or brown sugar
- 1/4 cup maple syrup
- 2 large eggs
- 1 teaspoon vanilla extract
- 1 teaspoon rosewater
Dry Ingredients
- 1/2 cup almond flour
- 1/4 cup cocoa powder
- 1/2 teaspoon baking soda
- 1/4 teaspoon salt
Add-ins and Topping
- 1/2 cup dark chocolate chips
- 1/3 cup chopped pistachios, plus extra for topping
Instructions
- Preheat & Prepare: Preheat the oven to 350°F (175°C) and line an 8×8-inch baking dish with parchment paper to prevent sticking and ease cleanup.
- Mix Wet Ingredients: In a mixing bowl, whisk together the melted coconut oil (or butter), coconut sugar, and maple syrup until the mixture is smooth and well combined, ensuring a moist brownie base.
- Add Eggs & Flavoring: Whisk in the eggs, vanilla extract, and rosewater thoroughly to incorporate the flavors and bind the batter.
- Incorporate Dry Ingredients: Sift in almond flour, cocoa powder, baking soda, and salt directly into the wet mixture. Stir gently until just combined to avoid overmixing, which keeps the brownies tender.
- Fold in Mix-ins: Gently fold in the dark chocolate chips and chopped pistachios to evenly distribute them in the batter for texture and flavor bursts.
- Bake: Pour the batter into the prepared baking dish and spread it evenly. Sprinkle extra pistachios on top for added crunch and visual appeal. Bake for 22-25 minutes until the center is set but still slightly fudgy, test with a toothpick to avoid overbaking.
- Cool & Serve: Allow the brownies to cool completely in the pan so they firm up for clean slicing. Once cooled, cut into 9 equal squares and serve.
Notes
- Use parchment paper to prevent sticking and help remove brownies easily from the pan.
- For a more intense rose flavor, adjust rosewater to taste but use cautiously as it can be overpowering.
- Substitute coconut oil with unsalted butter for a richer flavor.
- These brownies keep well stored in an airtight container at room temperature for up to 3 days or refrigerated for up to a week.
- You can freeze leftover brownies for up to 3 months; thaw at room temperature before serving.

