
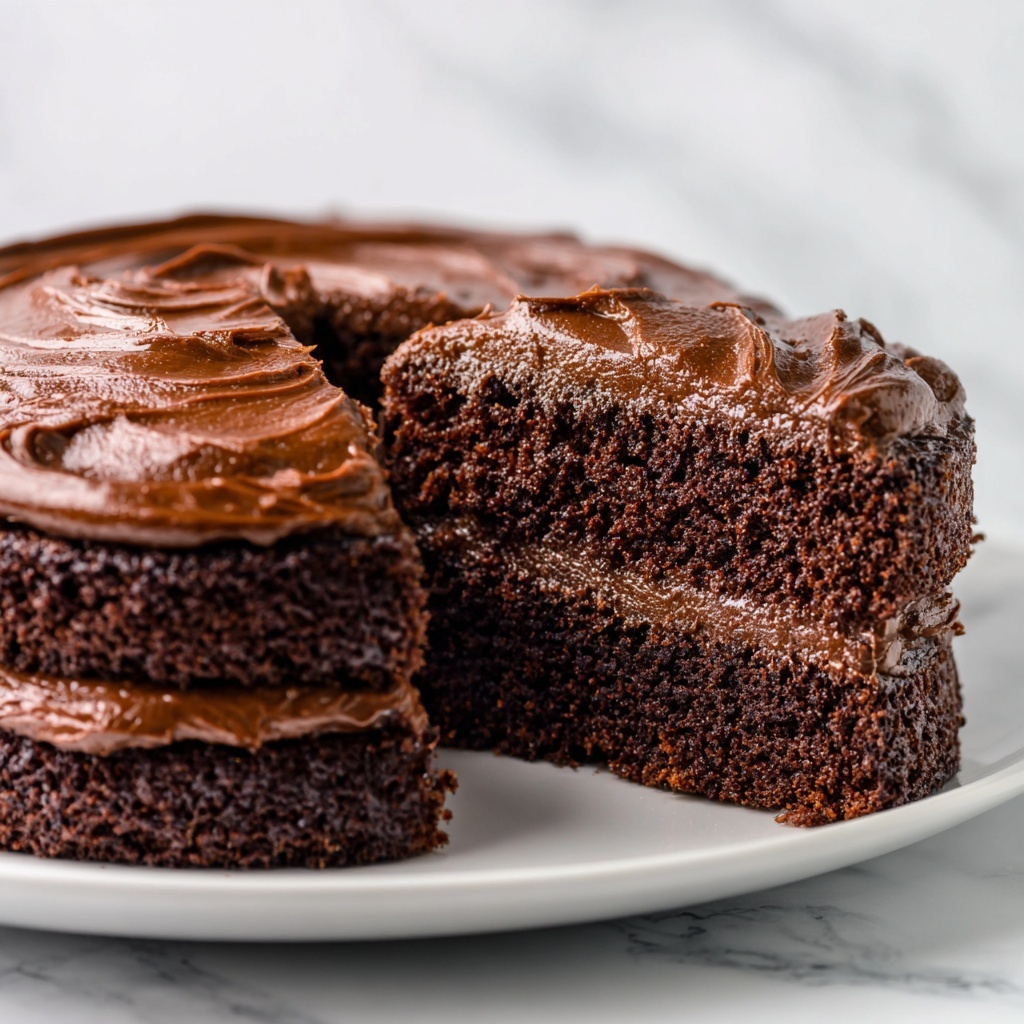
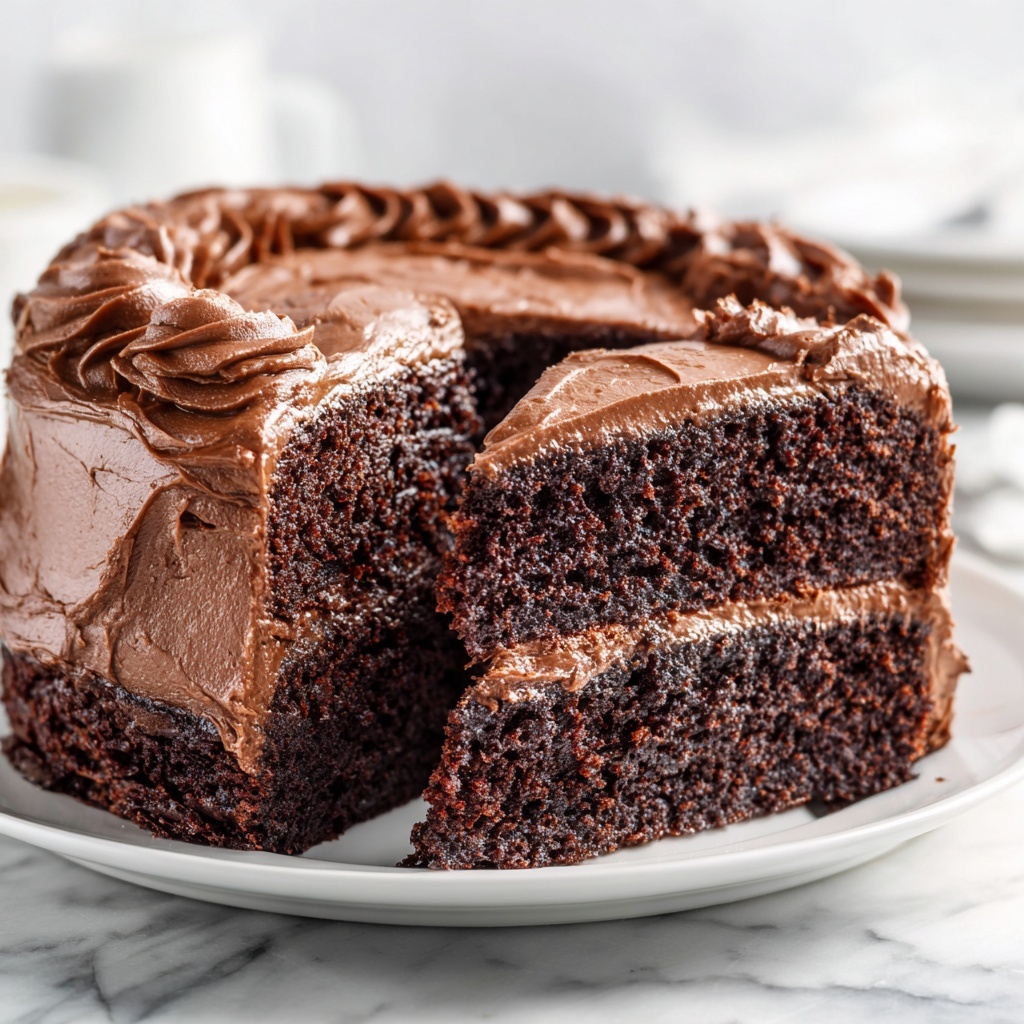
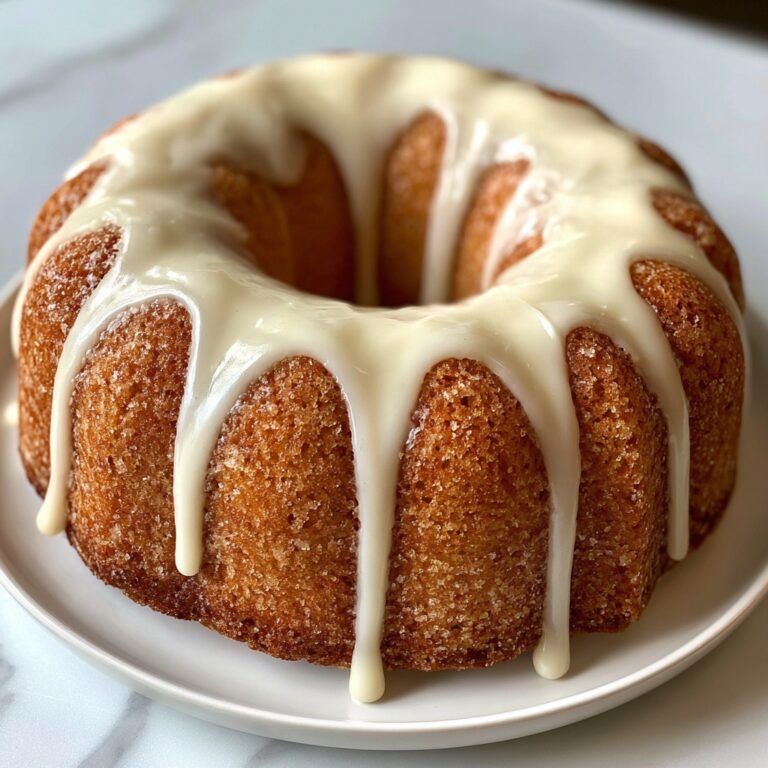
If you have a serious sweet tooth and love a chocolate cake that feels like a warm hug, you are going to adore the Dreamy Moist Matilda Chocolate Cake Recipe. It’s a showstopper that’s ridiculously moist, intensely chocolaty, and topped with a silky smooth frosting that’s simply irresistible. From the first bite to the last crumb, this cake strikes the perfect balance between fluffy texture and rich flavor, making it an instant crowd-pleaser perfect for any occasion when you want to impress family and friends with a homemade treat that tastes like pure magic.
Ingredients You’ll Need
These ingredients might look straightforward, but each one is thoughtfully chosen to create that perfect texture and flavor. Simple pantry staples come together here to build a deeply chocolaty, tender cake that feels like a labor of love.
- 1 and 3/4 cups all-purpose flour: The foundation that gives the cake its structure and fluffiness.
- 1 and 1/2 cups granulated sugar: Adds the perfect sweetness that balances the cocoa.
- 3/4 cup unsweetened cocoa powder: The heart of the chocolate flavor, rich and intense.
- 1 and 1/2 tsp baking powder: Helps the cake rise light and airy.
- 1 and 1/2 tsp baking soda: Adds extra lift and tenderness.
- 1/2 tsp salt: Enhances all the flavors for a well-rounded taste.
- 2 large eggs: Binds everything together while adding richness.
- 1 cup whole milk (or buttermilk for extra richness): Moistens the batter and provides creaminess.
- 1/2 cup vegetable oil: Keeps the cake incredibly moist and tender.
- 2 tsp vanilla extract: Adds a sweet aroma and depth of flavor.
- 1 cup boiling water: The secret to that ultra-moist texture that makes the cake almost melt in your mouth.
- 1/2 cup unsalted butter, softened: For a luscious and creamy frosting base.
- 2/3 cup unsweetened cocoa powder: Gives the frosting its rich chocolatey punch.
- 3 cups powdered sugar: Sweetens and thickens the frosting to a perfect spreadable consistency.
- 1/2 cup whole milk: Smooths out the frosting for easy spreading.
- 1 tsp vanilla extract: Adds a warm, inviting note to the frosting.
- A pinch of salt: Balances the sweetness and enhances the cocoa flavors.
How to Make Dreamy Moist Matilda Chocolate Cake Recipe
Step 1: Preheat and Prepare Your Pans
Begin by preheating your oven to 350°F (175°C). Grease and flour two 9-inch round cake pans or line them with parchment paper to make sure your cakes come out clean and beautiful. This little prep step makes all the difference when it’s time to unmold your baked beauties.
Step 2: Mix the Dry Ingredients
In a large bowl, whisk together the flour, sugar, cocoa powder, baking powder, baking soda, and salt. This ensures everything is evenly distributed so your cake rises perfectly and bakes evenly. Taking a moment to do this step right really sets your cake up for success.
Step 3: Add in the Wet Ingredients
Next, add the eggs, milk, vegetable oil, and vanilla extract to the dry mix. Stir it until everything is just combined—try not to overmix; otherwise, the cake might turn out dense. This combination is where the cake begins to take on its soft, tender character.
Step 4: Slowly Add Boiling Water
This might feel a little odd, but carefully pour the boiling water into your batter while stirring gently. The batter will become quite thin, but this is the magic behind your Dreamy Moist Matilda Chocolate Cake Recipe—it makes the crumb ultra-moist and delicate, practically melting on your tongue.
Step 5: Bake to Perfection
Divide the batter evenly between your prepared pans and pop them in the oven. Bake for about 30 to 35 minutes, or until a toothpick inserted in the center comes out clean. You’ll notice your kitchen filling up with an alluring chocolate aroma that is nothing short of captivating.
Step 6: Cool the Cakes
Once baked, allow the cakes to cool in the pans for about 10 minutes to settle before transferring them to a wire rack to cool completely. This ensures they’re firm enough to handle while still maintaining that moistness you crave.
Step 7: Make the Frosting
While your cakes cool, melt the butter over medium heat in a saucepan. Whisk in the cocoa powder until smooth and luscious. Then gradually stir in powdered sugar, milk, vanilla extract, and a pinch of salt. This frosting is silky, rich, and perfectly sweetened—just right to elevate your Dreamy Moist Matilda Chocolate Cake Recipe to dessert stardom.
Step 8: Cool and Layer
Let the frosting cool slightly so it’s easier to spread without melting the cake. Place one cake layer on your serving plate, spread a generous layer of frosting over it, then add the second layer and cover the top and sides of your cake with the remaining frosting. The result? A gorgeous cake that invites you in with pure chocolate goodness.
Step 9: Serve and Enjoy!
Give your cake a few minutes for the frosting to set before slicing. Then dive in and enjoy every bite of your homemade masterpiece. Trust me, this Dreamy Moist Matilda Chocolate Cake Recipe is the kind of dessert that will have everyone asking for seconds!
How to Serve Dreamy Moist Matilda Chocolate Cake Recipe
Garnishes
A simple dusting of powdered sugar or a few fresh berries can add a lovely burst of color and a touch of freshness to your chocolate masterpiece. You can also add chocolate curls or shavings on top for an elegant finish. These little touches not only make your cake look stunning but also heighten the eating experience.
Side Dishes
Pair your cake with a scoop of vanilla ice cream or a dollop of whipped cream to introduce a cool creaminess that complements the rich chocolate flavors. Fresh fruit like strawberries or raspberries can also provide a nice tart contrast that balances the sweetness beautifully.
Creative Ways to Present
Consider serving individual slices with a drizzle of caramel or a sprinkle of toasted nuts for added texture. For a special touch, plate it alongside espresso or flavored coffee to enhance the chocolate’s depth. You can even turn slices into mini dessert trifles layered with mousse or whipped cream — endless possibilities to impress!
Make Ahead and Storage
Storing Leftovers
After enjoying your cake, wrap any leftovers tightly in plastic wrap or store in an airtight container. Keeping it refrigerated will preserve the moist texture and prevent the frosting from melting, allowing your cake to stay fresh and delicious for up to 3-4 days.
Freezing
This cake freezes beautifully! Wrap it well with plastic wrap and then aluminum foil to avoid freezer burn. Frozen, it maintains its moisture and flavor for up to 2 months. When you’re ready to enjoy it again, simply thaw it overnight in the fridge for the best texture.
Reheating
If you prefer your chocolate cake slightly warmed, gently heat individual slices in the microwave for 10 to 15 seconds. This warm-up intensifies the chocolate flavors and softens the frosting, making every bite feel freshly baked and heavenly.
FAQs
Can I use a different type of flour for this cake?
All-purpose flour works best here to achieve the perfect texture, but if you want to try whole wheat or gluten-free flour blends, make sure they are designed for baking. Keep in mind this might slightly alter the cake’s tenderness and rise.
What if I don’t have boiling water?
Boiling water is key for this cake’s moistness, but if you must, you can use hot tap water. Just be aware that it might slightly reduce how moist the final cake turns out. Boiling water truly unlocks that dreamy texture!
Can I use oil other than vegetable oil?
Yes, light-flavored oils like canola or sunflower oil are excellent substitutes. Avoid using strongly flavored oils like olive oil to keep the chocolate flavor pure and delicious.
How do I ensure my cake layers bake evenly?
Make sure to evenly divide your batter between pans and tap them gently on the counter to release air bubbles. Also, check your oven temperature with an oven thermometer if possible to avoid hot spots that can cause uneven baking.
Is there a way to make this cake dairy-free?
Absolutely! Swap the milk for almond, soy, or oat milk, and replace butter in the frosting with a dairy-free margarine or coconut oil. The cake will still be wonderfully moist and tasty with these substitutions.
Final Thoughts
Baking the Dreamy Moist Matilda Chocolate Cake Recipe is more than making dessert—it’s an experience filled with joy, anticipation, and indulgence. Once you taste this cake, you’ll be amazed at how something so simple in ingredients can transform into something truly extraordinary. So go ahead, bake this cake, share it, and watch it bring smiles all around your table. You deserve this delicious moment!
Print
Dreamy Moist Matilda Chocolate Cake Recipe
- Prep Time: 20 minutes
- Cook Time: 35 minutes
- Total Time: 55 minutes
- Yield: 12 servings
- Category: Dessert
- Method: Baking
- Cuisine: American
Description
This Dreamy Moist Matilda Chocolate Cake is a rich, incredibly moist chocolate cake perfect for any celebration. Made with simple pantry staples and enhanced with boiling water for extra moisture, it’s layered with a luscious cocoa buttercream frosting that melts in your mouth. The recipe produces two 9-inch layers, ideal for parties or family gatherings.
Ingredients
Cake Ingredients
- 1 and 3/4 cups all-purpose flour
- 1 and 1/2 cups granulated sugar
- 3/4 cup unsweetened cocoa powder
- 1 and 1/2 tsp baking powder
- 1 and 1/2 tsp baking soda
- 1/2 tsp salt
- 2 large eggs
- 1 cup whole milk (or buttermilk for extra richness)
- 1/2 cup vegetable oil
- 2 tsp vanilla extract
- 1 cup boiling water
Frosting Ingredients
- 1/2 cup unsalted butter, softened
- 2/3 cup unsweetened cocoa powder
- 3 cups powdered sugar
- 1/2 cup whole milk
- 1 tsp vanilla extract
- A pinch of salt
Instructions
- Preheat the Oven: Preheat your oven to 350°F (175°C). Grease and flour two 9-inch round cake pans or line them with parchment paper to ensure the cakes don’t stick.
- Mix Dry Ingredients: In a large bowl, whisk together the flour, granulated sugar, cocoa powder, baking powder, baking soda, and salt until well combined to create a uniform dry mixture.
- Add Wet Ingredients: Add the eggs, whole milk, vegetable oil, and vanilla extract into the dry ingredients. Mix thoroughly until the batter is smooth and uniform.
- Incorporate Boiling Water: Gradually pour in the boiling water while stirring continuously. This will thin the batter significantly but is crucial for achieving the cake’s characteristic moist texture.
- Bake: Evenly divide the batter between the two prepared cake pans. Bake in the preheated oven for 30 to 35 minutes, or until a toothpick inserted into the center of the cakes comes out clean.
- Cool: Allow the cakes to cool in the pans for about 10 minutes. Then turn them out onto a wire rack to cool completely before adding the frosting.
- Make the Frosting: In a medium saucepan over medium heat, melt the softened butter. Once melted, whisk in the cocoa powder until smooth and fully incorporated.
- Combine Ingredients for Frosting: Slowly add the powdered sugar, whole milk, vanilla extract, and a pinch of salt to the cocoa-butter mixture, stirring constantly until the frosting is smooth and glossy.
- Cool Slightly: Let the frosting sit for a few minutes to thicken slightly, which will make it easier to spread over the cake layers.
- Layer the Cake: Place one cooled cake layer on your serving platter. Spread a generous amount of frosting evenly over the surface.
- Top with Second Layer: Place the second cake layer on top of the frosted first layer. Use the remaining frosting to cover the top and sides of the entire cake evenly.
- Serve: Allow the frosting to set for a few minutes before slicing. Serve at room temperature and enjoy your moist, chocolatey delight!
Notes
- For an even richer cake, substitute buttermilk for the whole milk.
- Ensure the boiling water is added slowly and mixed well to prevent lumps.
- Allow the cake layers to cool completely before frosting to avoid melting the frosting.
- You can store the frosted cake in an airtight container at room temperature for up to 2 days or refrigerate for up to 5 days.
- Bring refrigerated cake to room temperature before serving for the best flavor and texture.

