
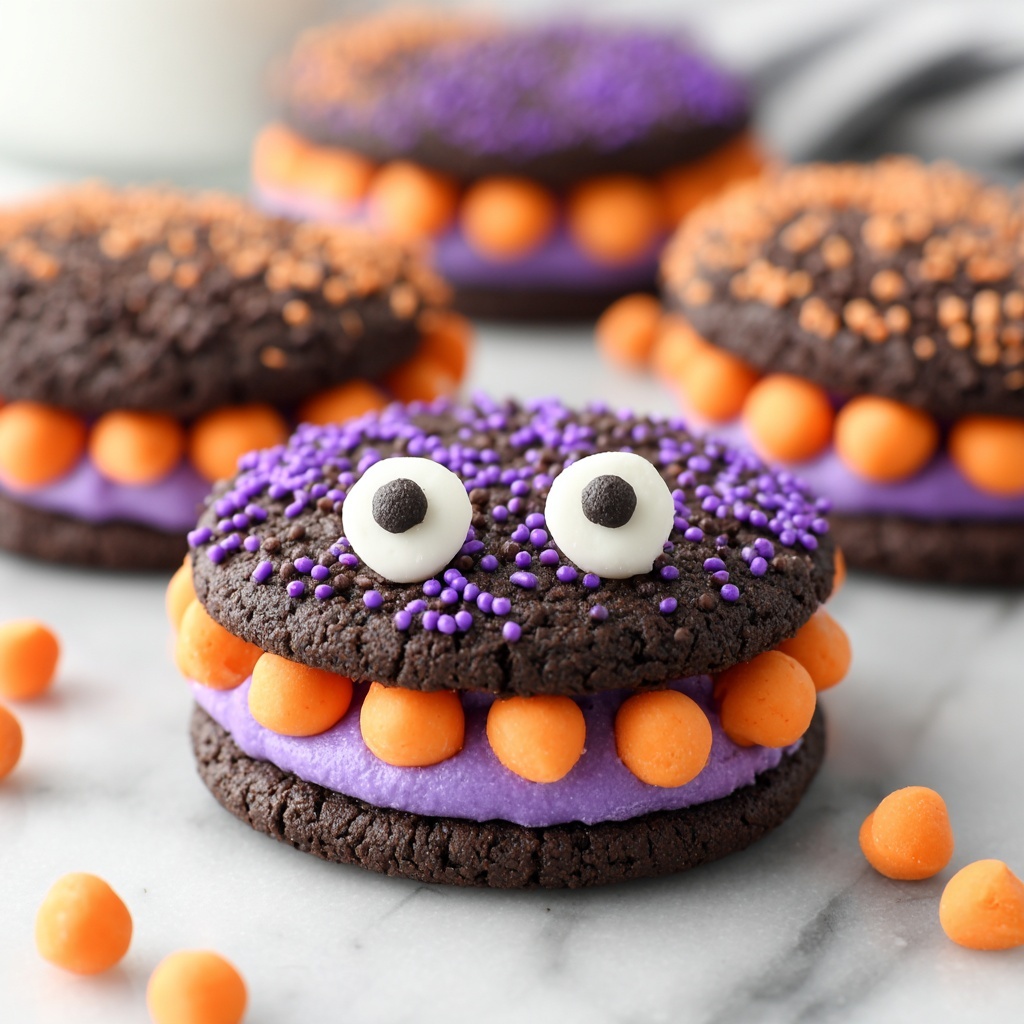
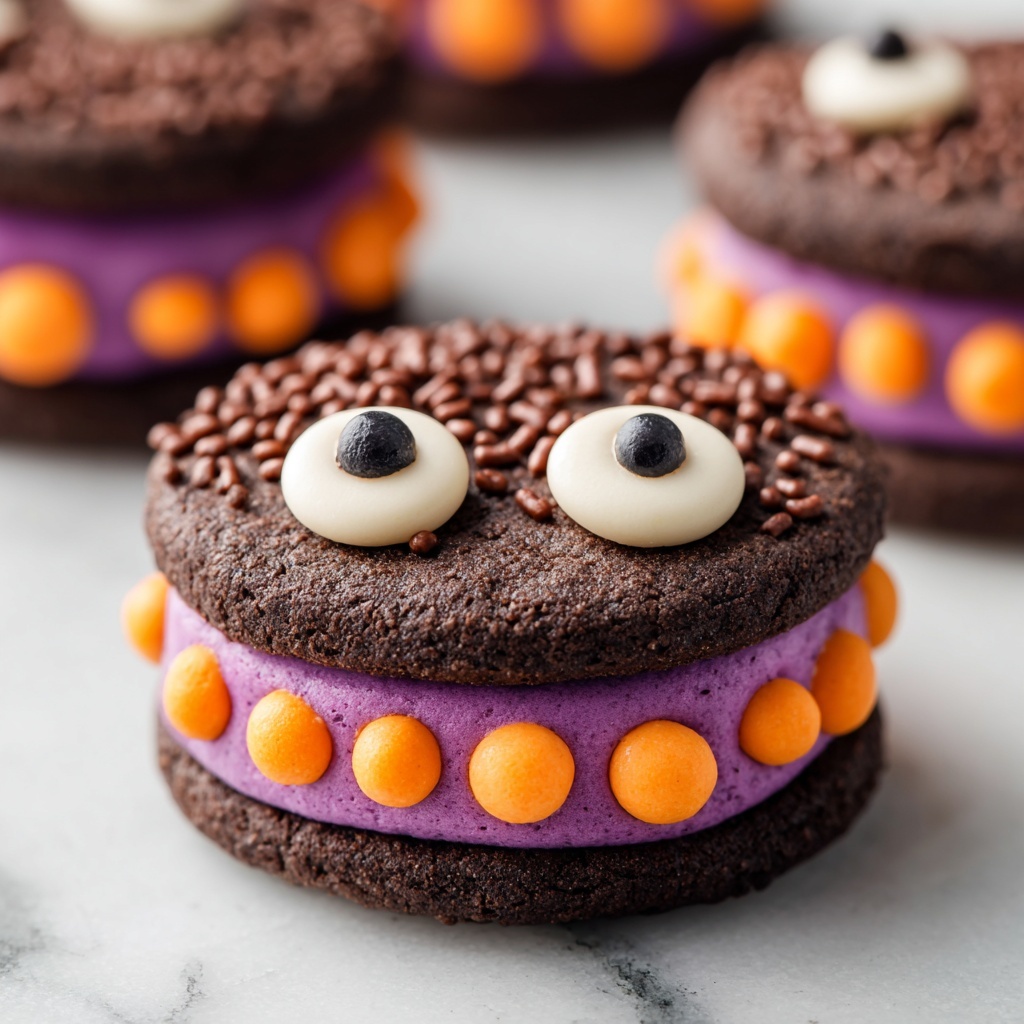
If you are looking for a fun, festive, and utterly delicious treat to make for your spooky celebrations, the Chocolate Monster Halloween Cookies Recipe is exactly what you need. These rich cocoa cookies sandwich a luscious, colorful buttercream filling and are decorated with playful monster eyes and sprinkles, making them the perfect Halloween indulgence that’s both eye-catching and irresistible. Whether you’re baking with friends or surprising your family, these cookies bring excitement and joy with every bite.
Ingredients You’ll Need
Getting started with the Chocolate Monster Halloween Cookies Recipe is straightforward and fun, thanks to the simple yet essential ingredients. Each one plays a crucial role, from creating the tender chocolate base to the creamy, festive filling that makes these cookies so memorable.
- 260 g (2 cups) all-purpose flour: Provides the structure and body for the cookies.
- 60 g (½ cup) Dutch-processed cocoa powder: Offers a deep, rich chocolate flavor and dark color.
- ½ tsp baking powder: Gives a slight lift and lightness to the cookie dough.
- ¾ cup (150 g) white sugar: Adds sweetness and helps with the cookie’s texture.
- 113 g (½ cup) unsalted butter, cold and cubed: Creates flakiness and richness in the dough.
- 1 large egg, cold: Binds the ingredients together perfectly.
- 1 tsp vanilla extract: Enhances the overall flavor with a warm, fragrant note.
- 1 tbsp cold milk: Helps achieve the ideal dough consistency.
- 1½ cups (195 g) powdered sugar: For a smooth, sweet buttercream.
- 80 g (⅔ stick) unsalted butter, softened: Essential for creamy, spreadable filling.
- 2 tsp heavy cream: Adds richness and a silky texture to the buttercream.
- 1 tsp vanilla extract: Provides a complementary flavor to the frosting.
- Pinch of salt: Balances sweetness and enhances flavors.
- Purple and orange food coloring: Bring a festive Halloween pop of color to the filling.
- Sprinkles and candy monster eyes: The perfect finishing touch to make each cookie a little monster masterpiece.
How to Make Chocolate Monster Halloween Cookies Recipe
Step 1: Preparing the Cookie Dough
Start by preheating your oven to 350°F (180°C) and lining two baking trays with parchment paper to make cleanup effortless. Combine the all-purpose flour, cocoa powder, baking powder, and sugar in a food processor—this ensures an even distribution of dry ingredients. Then, add the cold, cubed butter to the processor and pulse until the mixture looks like fine crumbs, which will give your cookies a tender, crumbly texture once baked.
Step 2: Bringing the Dough Together
Next, add the cold egg, vanilla extract, and half of the cold milk to the processor, pulsing until the dough forms large clumps. This step is key to making sure your dough isn’t too dry or too wet. If the dough feels too stiff, add the remaining cold milk gradually until it just holds together. Then, turn the dough onto a clean surface and gently knead it just enough to bring it all together without overworking it, which could make the cookies tough.
Step 3: Rolling and Chilling the Dough
Roll out the dough between two sheets of baking paper until it’s about 4 to 5 mm thick. This thickness creates cookies that are nicely balanced in bite—thin enough to be crisp but thick enough to hold the filling. Pop the rolled dough into the fridge for about 30 minutes to chill, which makes cutting the cookies easier and helps them maintain their shape during baking.
Step 4: Cutting and Baking
Once chilled, use a 2-inch circle cutter to cut out your cookies and arrange them about an inch apart on the prepared baking trays. Don’t forget to re-roll the scraps to make the most of your dough! Bake the cookies for 6 minutes, then rotate the trays and bake for another 6 minutes. This ensures an even bake and perfectly tender cookies with a slight crisp on the edges. Allow them to cool completely on a wire rack before assembling.
Step 5: Making the Buttercream Filling
For the delicious filling, blend powdered sugar, softened butter, heavy cream, vanilla extract, and a pinch of salt in a clean food processor. Process until the mixture turns smooth and pale—a sign that the buttercream is perfectly whipped and ready to spread. Divide the buttercream into two bowls and add purple food coloring to one and orange to the other, creating those iconic Halloween colors that will make your cookies truly festive.
Step 6: Assembling and Decorating
Now for the fun part – sandwich a teaspoon of the colored buttercream on the bottom of half your cookies and gently press the remaining cookies on top to form sandwiches. Let your creativity shine by decorating these little monsters with candy eyes and sprinkles, giving each cookie a whimsical personality. If desired, refrigerate the cookies to help the buttercream firm up; otherwise, serve them immediately to enjoy their freshness.
How to Serve Chocolate Monster Halloween Cookies Recipe
Garnishes
While the candy monster eyes and colorful sprinkles add a lot of charm, you can also sprinkle edible glitter or add tiny candy fangs for an extra spooky twist. Adding a few mini chocolate chips around the edges before sandwiching can bring a fun texture surprise.
Side Dishes
Pair these monster cookies with a cold glass of milk, a steaming cup of your favorite coffee, or a rich hot chocolate for a cozy Halloween treat experience that feels comforting yet indulgent. They work beautifully with warm autumnal beverages like spiced apple cider too.
Creative Ways to Present
Turn your Chocolate Monster Halloween Cookies Recipe into a full Halloween display by arranging them on a platter decorated with edible fake spider webs, mini pumpkins, and autumn leaves. You could even wrap them individually in clear Halloween-themed bags tied with colorful ribbons for party favors or trick-or-treat handouts that everyone will adore.
Make Ahead and Storage
Storing Leftovers
Store any leftover cookies in an airtight container at room temperature for up to 3 days. The buttercream filling stays soft and creamy, making each bite as delightful as the day you baked them.
Freezing
If you want to prepare in advance, you can freeze the unfilled cookie rounds in a single layer on a baking sheet, then transfer them to a freezer-safe bag for up to 2 months. Thaw before assembling with the buttercream to keep the cookies fresh and perfectly textured.
Reheating
Since these are delicate sandwich cookies with buttercream, it’s best to enjoy them at room temperature. If you prefer, warming them slightly (about 10 seconds in the microwave) can soften the buttercream just a touch, but avoid overheating as this can cause the filling to melt and the cookie to lose its shape.
FAQs
Can I use regular cocoa powder instead of Dutch-processed cocoa?
Yes, you can substitute regular cocoa powder, but Dutch-processed cocoa gives a smoother flavor and darker color that enhances the Halloween vibe of these cookies. Just keep in mind that regular cocoa can be a bit more acidic and might affect the final texture slightly.
How do I prevent the cookies from spreading too much while baking?
Chilling the dough before cutting and baking is key to keeping the cookies from spreading. Also, using cold butter and only mixing the dough until it just comes together helps maintain their shape during baking.
Can I make these cookies gluten-free?
Absolutely! Use a gluten-free all-purpose flour blend that’s suitable for baking, but be mindful that the texture might vary slightly. Make sure to check that your other ingredients, like sprinkles and coloring, are gluten-free as well.
How long will the decorated cookies last?
Once decorated, the cookies are best enjoyed within 2-3 days at room temperature. The buttercream filling is fresh and might start to soften or dry out after that period.
Can I substitute food coloring with natural alternatives?
Yes! You can use natural coloring like beet juice for red/purple hues and carrot or pumpkin juice for orange tones. Just keep in mind that natural colorings tend to be less vibrant and might alter the flavor slightly.
Final Thoughts
This Chocolate Monster Halloween Cookies Recipe is one of those irresistibly fun and tasty holiday treats that bring smiles and sweet memories all around. Whether you’re baking for a party or just to enjoy with loved ones, these cookies add a perfect blend of spooky charm and chocolaty goodness. Trust me, once you try making these playful little monsters, they’ll become a Halloween favorite that you’ll want to bake year after year.
Print
Chocolate Monster Halloween Cookies Recipe
- Prep Time: 15 minutes
- Cook Time: 12 minutes
- Total Time: 42 minutes
- Yield: 24 servings
- Category: Dessert
- Method: Baking
- Cuisine: American
Description
These Chocolate Monster Halloween Cookies are rich, cocoa-flavored sandwich cookies filled with vibrant, colorful buttercream and topped with fun sprinkles and candy monster eyes—perfect for spooky celebrations and festive treats.
Ingredients
Cookies
- 260 g (2 cups) all-purpose flour
- 60 g (½ cup) Dutch-processed cocoa powder
- ½ tsp baking powder
- ¾ cup (150 g) white sugar
- 113 g (½ cup) unsalted butter, cold and cut into cubes
- 1 large egg, cold
- 1 tsp vanilla extract
- 1 tbsp cold milk
Buttercream Filling
- 1½ cups (195 g) powdered sugar
- 80 g (⅔ stick) unsalted butter, softened
- 2 tsp heavy cream
- 1 tsp vanilla extract
- Pinch of salt
- Purple and orange food coloring
- Sprinkles and candy monster eyes for decoration
Instructions
- Preheat the oven: Set your oven to 350°F (180°C) and line two baking trays with parchment paper to prepare for baking the cookies.
- Prepare cookie dough mixture: In a food processor, combine the all-purpose flour, Dutch-processed cocoa powder, baking powder, and white sugar. Add the cold cubed butter and pulse until the mixture resembles fine crumbs.
- Add wet ingredients: Add the cold egg, vanilla extract, and half of the cold milk to the food processor. Process until the dough forms large clumps. If necessary, add the remaining milk gradually to bring the dough together.
- Knead and chill the dough: Lightly knead the dough on a clean surface until it holds together well. Roll it out between two sheets of baking paper to about 4-5 mm thickness. Chill the dough in the refrigerator for 30 minutes to firm up.
- Cut and arrange cookies: Using a 2-inch circle cutter, cut out cookies and place them about 1 inch apart on the prepared baking trays. Re-roll any leftover dough and repeat cutting.
- Bake the cookies: Bake the cookies for 6 minutes, then rotate the trays to ensure even baking and bake for another 6 minutes. Once baked, transfer cookies to a wire rack to cool completely.
- Make the buttercream filling: Clean the food processor and blend together powdered sugar, softened butter, heavy cream, vanilla extract, and a pinch of salt until smooth and pale in color.
- Color the buttercream: Divide the buttercream into two bowls and tint one with purple food coloring and the other with orange food coloring, mixing each thoroughly.
- Assemble the cookies: Spoon a teaspoon of colored buttercream onto the center of half the cookies, then sandwich them with the remaining cookies. Decorate the tops with candy monster eyes and sprinkles.
- Serve or chill: Refrigerate the assembled cookies if you want the buttercream to firm up, or serve them immediately for a delightfully soft texture.
Notes
- Ensure the butter used for the dough is cold to achieve a crumbly, tender cookie texture.
- Chilling the dough before cutting helps maintain cookie shape during baking.
- Rotate baking trays halfway to promote even cooking and prevent burning.
- Use Dutch-processed cocoa powder for a richer chocolate flavor and darker color.
- Store cookies in an airtight container; they can be refrigerated to keep the buttercream fresh longer.


