
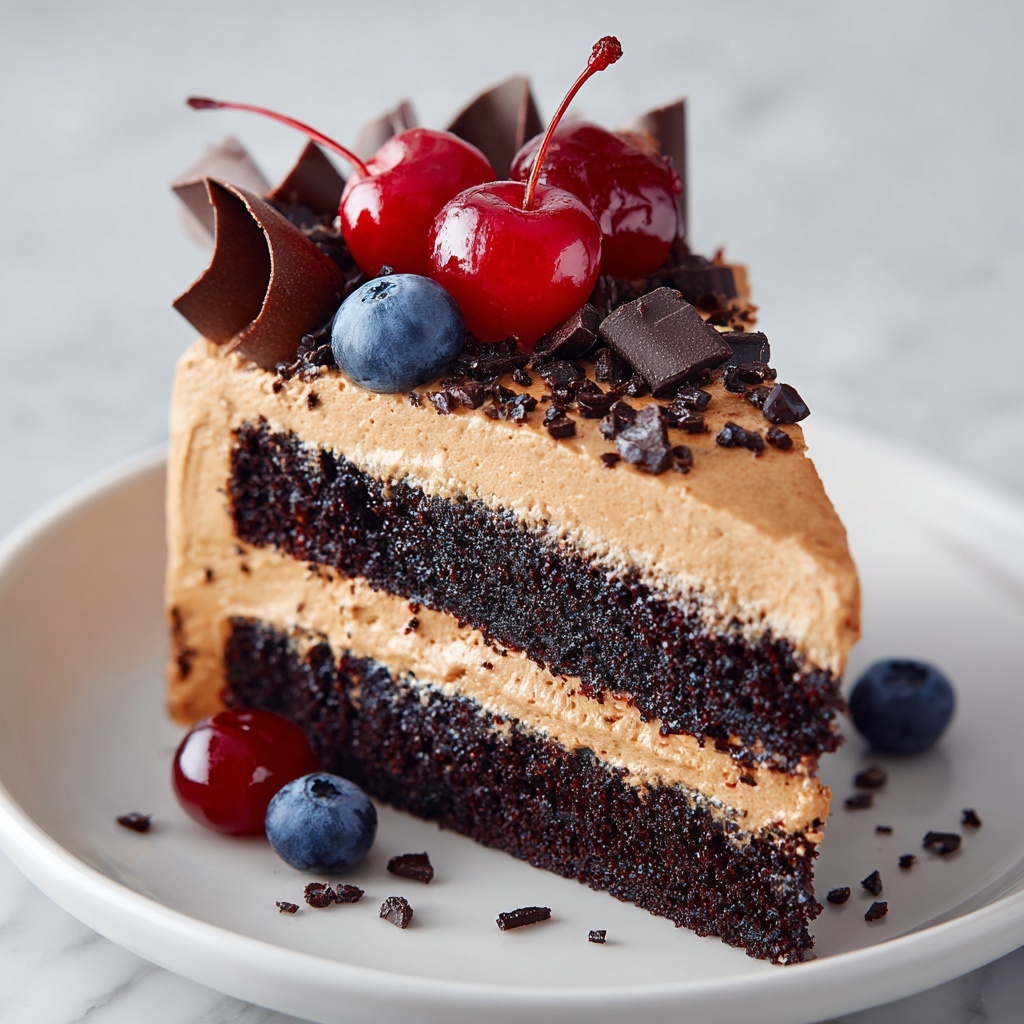
If you have a serious sweet tooth and love all things rich and chocolatey, then this Chocolate Forest Cake Recipe is going to be your new best friend. Imagine layers of moist chocolate cake soaked in a delicate balance of cocoa, paired with a luscious, silky dark chocolate mousse that melts in your mouth. This dessert doesn’t just taste fantastic, it looks stunning too, adorned with elegant chocolate curls and a dusting of powdered sugar that’ll make any celebration unforgettable. Trust me, once you try this recipe, the Chocolate Forest Cake will become a highlight on your dessert menu.
Ingredients You’ll Need
Gathering the right ingredients for this Chocolate Forest Cake Recipe is surprisingly simple, yet each component plays a crucial role in creating the perfect texture, flavor, and appearance. From rich cocoa powder bringing depth to the cake, to heavy cream transforming into decadent mousse, these ingredients come together with ease to produce something truly special.
- 1 ¾ cups all-purpose flour: The base that gives structure to the cake layers, ensuring a tender crumb.
- 1 ½ tsp baking powder: A leavening agent that helps the cake rise beautifully.
- ½ tsp baking soda: Works alongside baking powder to give extra lift and lightness.
- ¾ cup unsweetened cocoa powder: Adds that deep, rich chocolate flavor every chocolate lover craves.
- 1 ¼ cups granulated sugar: Sweetens the cake just enough without overpowering the chocolate.
- 2 large eggs: Bind the ingredients and add moisture.
- ½ cup vegetable oil: Keeps the cake moist and tender with a neutral flavor.
- 1 tsp vanilla extract: Enhances the chocolate flavor and adds subtle warmth.
- 1 cup whole milk: Balances the dry ingredients and enriches the batter.
- ½ cup boiling water: Helps bloom the cocoa powder for an intensely chocolatey taste.
- Pinch of salt: Elevates the sweetness and deepens flavor complexity.
- 1 ½ cups heavy cream: The heart of the mousse, whipped to airy perfection.
- 8 oz dark chocolate (70% cocoa), chopped: Creates a luscious dark mousse that pairs perfectly with the cake.
- 2 tbsp powdered sugar: Sweetens the mousse without graininess.
- Powdered sugar, for dusting: Adds a delicate finishing touch to the decoration.
- Shaved chocolate or chocolate curls: Gorgeous garnishes to amp up the chocolate appeal.
- Fresh mint leaves (optional): A pop of color and refreshing aroma.
How to Make Chocolate Forest Cake Recipe
Step 1: Prepare Your Cake Pans and Oven
Start by preheating your oven to 350°F (175°C). It’s important to grease and line two 9-inch round cake pans with parchment paper to ensure your chocolate cake layers come out perfectly without sticking. Taking this simple step saves a lot of frustration later!
Step 2: Mix the Dry Ingredients
Grab a medium bowl and whisk together the all-purpose flour, baking powder, baking soda, cocoa powder, and a pinch of salt. This blend creates a uniform base, helping every bite have consistent flavor and texture.
Step 3: Beat the Wet Ingredients
In a large bowl, beat together the sugar, eggs, vegetable oil, and vanilla extract until the mixture is smooth and fluffy. This step is essential because it incorporates air, lending a lightness to the cake batter that makes it wonderfully tender.
Step 4: Combine Dry and Wet with Milk
Gradually add your dry ingredient mixture to the wet ingredients in batches, alternating with the whole milk. This technique keeps your batter smooth and prevents lumps. Mix everything until it’s just combined to avoid overworking the batter, which could make the cake dense.
Step 5: Add Boiling Water
Gently stir in the boiling water. The batter will be much thinner than typical cake batters—don’t worry, this is exactly right. The hot water activates the cocoa powder’s rich flavor, giving the cake an intense chocolate kick.
Step 6: Bake the Cake Layers
Pour the batter evenly between the prepared pans, then bake for 25 to 30 minutes. To test for doneness, insert a toothpick into the center—if it comes out clean, your cake is ready. Allow the cakes to cool in their pans for 10 minutes, then carefully transfer to a wire rack to cool completely.
Step 7: Make the Chocolate Mousse
In a saucepan over medium heat, warm the heavy cream until it’s just starting to simmer—be careful not to let it boil. Remove from heat and stir in the chopped dark chocolate until silky smooth. Let this mixture cool to room temperature before chilling it in the refrigerator for about an hour.
Step 8: Whip the Mousse to Perfection
Once chilled and firm, whip the mousse with an electric mixer until soft peaks form. Add the powdered sugar and vanilla extract, then continue whipping until stiff peaks appear. This mousse will be luxuriously creamy and hold up beautifully between the cake layers.
Step 9: Assemble Your Chocolate Forest Cake
Place one cake layer on your serving plate and spread a thick layer of mousse on top. Add the second cake layer and cover the entire cake with the remaining mousse. Smooth the sides and top for a neat finish that showcases the rich chocolate velvet inside.
How to Serve Chocolate Forest Cake Recipe

Garnishes
To complete your Chocolate Forest Cake Recipe, sprinkle a light dusting of powdered sugar over the top to create an elegant snowy effect. Then, adorn the cake with shaved chocolate or chocolate curls for a dramatic, beautiful finish. If you want a fresh pop of color and a hint of aroma, adding a few fresh mint leaves is a winning touch.
Side Dishes
This cake is stunning enough to shine all on its own, but if you’re serving at a gathering, pairing it with a scoop of vanilla ice cream or a dollop of fresh whipped cream can be delightful. You might also try fresh berries on the side—the tartness balances the richness wonderfully, creating a sophisticated flavor combination.
Creative Ways to Present
Impress your guests by cutting the Chocolate Forest Cake into tall, neat slices and serving on white plates to highlight the cake’s dark chocolate layers. For an extra touch, drizzle a raspberry coulis alongside or serve in individual glass trifle dishes layered with the mousse and cake pieces for a whimsical twist on the classic presentation.
Make Ahead and Storage
Storing Leftovers
Once assembled, cover your cake tightly with plastic wrap or store it in an airtight container to keep it fresh. It will stay delicious in the refrigerator for up to three days—this is perfect if you want to prepare in advance or enjoy a few indulgent slices later.
Freezing
You can freeze the cake for longer storage by wrapping it securely in plastic wrap and then in aluminum foil. Freeze for up to one month. When you’re ready to indulge, transfer the cake to the refrigerator to thaw slowly overnight for best texture preservation.
Reheating
This Chocolate Forest Cake Recipe is best enjoyed chilled or at room temperature, so reheating isn’t generally recommended. If you prefer, bring the cake out of the fridge about 30 minutes before serving to soften the mousse layers just slightly, enhancing the melt-in-your-mouth experience.
FAQs
Can I use milk chocolate instead of dark chocolate for the mousse?
Absolutely! Using milk chocolate will yield a sweeter, creamier mousse with a milder chocolate flavor. Just keep in mind it won’t be as intense as when using dark chocolate with high cocoa content.
Is there a way to make this cake gluten-free?
Yes, you can substitute the all-purpose flour with a gluten-free flour blend designed for baking. Make sure the blend contains xanthan gum or another binder for best results, as this helps maintain the cake’s structure and moisture.
Can I prepare the mousse a day ahead?
Definitely. The mousse can be made a day in advance and kept refrigerated. Whip it just before assembling the cake to give that fresh, light texture, or whip it in advance and gently fold before spreading.
How do I prevent the cake from drying out?
Keeping the cake moist is all about proper storage. Once cooled, wrap each layer tightly in plastic wrap if you’re not assembling immediately, and store in an airtight container. Also, do not overbake—stick to the 25-30 minute baking time and perform the toothpick test to check doneness.
What other flavors complement the Chocolate Forest Cake Recipe?
Raspberry, cherry, or orange flavors pair beautifully with this cake. You can incorporate fresh berries within the layers or serve with a citrus-infused sauce for contrast. Adding a splash of coffee to the cake batter can also enhance the chocolate’s complexity.
Final Thoughts
If you’re craving a dessert that combines dramatic looks with indulgent flavors, I can’t recommend this Chocolate Forest Cake Recipe enough. It’s a showstopper that’s surprisingly straightforward to make, rewarding your efforts with a deeply satisfying chocolate experience. Whether for a special celebration or just because chocolate makes life better, this cake is sure to be loved by everyone at the table. So go on, grab your ingredients, and bake some happiness!
Print
Chocolate Forest Cake Recipe
- Prep Time: 20 minutes
- Cook Time: 30 minutes
- Total Time: 50 minutes
- Yield: 10 servings
- Category: Dessert
- Method: Baking
- Cuisine: International
Description
This rich and decadent Chocolate Forest Cake features moist layers of chocolate sponge cake paired with a luscious, airy chocolate mousse. Perfect for chocolate lovers, this elegant dessert is finished with powdered sugar dusting, chocolate curls, and optional fresh mint leaves for a charming presentation. Ideal for celebrations or a special treat, it combines classic baking with creamy mousse for a truly indulgent experience.
Ingredients
For the Cake:
- 1 ¾ cups all-purpose flour
- 1 ½ tsp baking powder
- ½ tsp baking soda
- ¾ cup unsweetened cocoa powder
- 1 ¼ cups granulated sugar
- 2 large eggs
- ½ cup vegetable oil
- 1 tsp vanilla extract
- 1 cup whole milk
- ½ cup boiling water
- Pinch of salt
For the Chocolate Mousse:
- 1 ½ cups heavy cream
- 8 oz dark chocolate (70% cocoa), chopped
- 1 tsp vanilla extract
- 2 tbsp powdered sugar
For the Decoration:
- Powdered sugar, for dusting
- Shaved chocolate or chocolate curls
- Fresh mint leaves (optional)
Instructions
- Preheat and prepare pans: Preheat your oven to 350°F (175°C). Grease and line two 9-inch round cake pans with parchment paper to ensure the cakes do not stick.
- Combine dry ingredients: In a medium bowl, whisk together the all-purpose flour, baking powder, baking soda, cocoa powder, and a pinch of salt. This ensures even distribution of leavening agents and cocoa throughout the batter.
- Mix wet ingredients: In a large bowl, beat together the granulated sugar, eggs, vegetable oil, and vanilla extract until the mixture is smooth and fluffy, incorporating air for a light texture.
- Incorporate dry and wet ingredients: Gradually add the dry ingredients to the wet ingredients, alternating with the whole milk. Mix gently until combined without overmixing to maintain tenderness.
- Add boiling water: Carefully stir in the boiling water; the batter will become thin, which is expected and contributes to a moist cake.
- Divide batter and bake: Evenly divide the batter between the prepared cake pans. Place in the preheated oven and bake for 25-30 minutes, or until a toothpick inserted into the center comes out clean.
- Cool the cakes: Allow the cakes to cool in the pans for about 10 minutes, then transfer them to a wire rack to cool completely before assembling.
- Prepare chocolate mousse – heat cream: Pour the heavy cream into a saucepan and heat over medium heat until it just begins to simmer, being careful not to let it boil.
- Combine chocolate and cream: Remove the cream from heat and stir in the chopped dark chocolate until completely melted and the mixture is smooth.
- Chill mousse mixture: Allow the chocolate mixture to cool to room temperature, then refrigerate for around 1 hour or until it firms up to a thick consistency.
- Whip mousse: Using an electric mixer, whip the chilled chocolate mixture until soft peaks form. Add powdered sugar and vanilla extract, then continue whipping until stiff peaks form, creating a light and fluffy mousse.
- Assemble and decorate: Layer the cooled cake rounds with chocolate mousse between each layer. Finish by dusting powdered sugar on top and decorating with shaved chocolate curls and optional fresh mint leaves for a beautiful presentation.
Notes
- Be sure to fully cool the cake layers before assembling to prevent the mousse from melting.
- The boiling water in the batter helps produce a moist and tender crumb.
- Use high-quality dark chocolate with 70% cocoa for the best flavor in the mousse.
- You can prepare the mousse in advance to save time; just store it refrigerated until ready to whip and assemble.
- For an extra rich chocolate flavor, dust some cocoa powder alongside powdered sugar on top as decoration.
- If you prefer, substitute vegetable oil with melted butter for a slightly different texture and richer flavor.


