
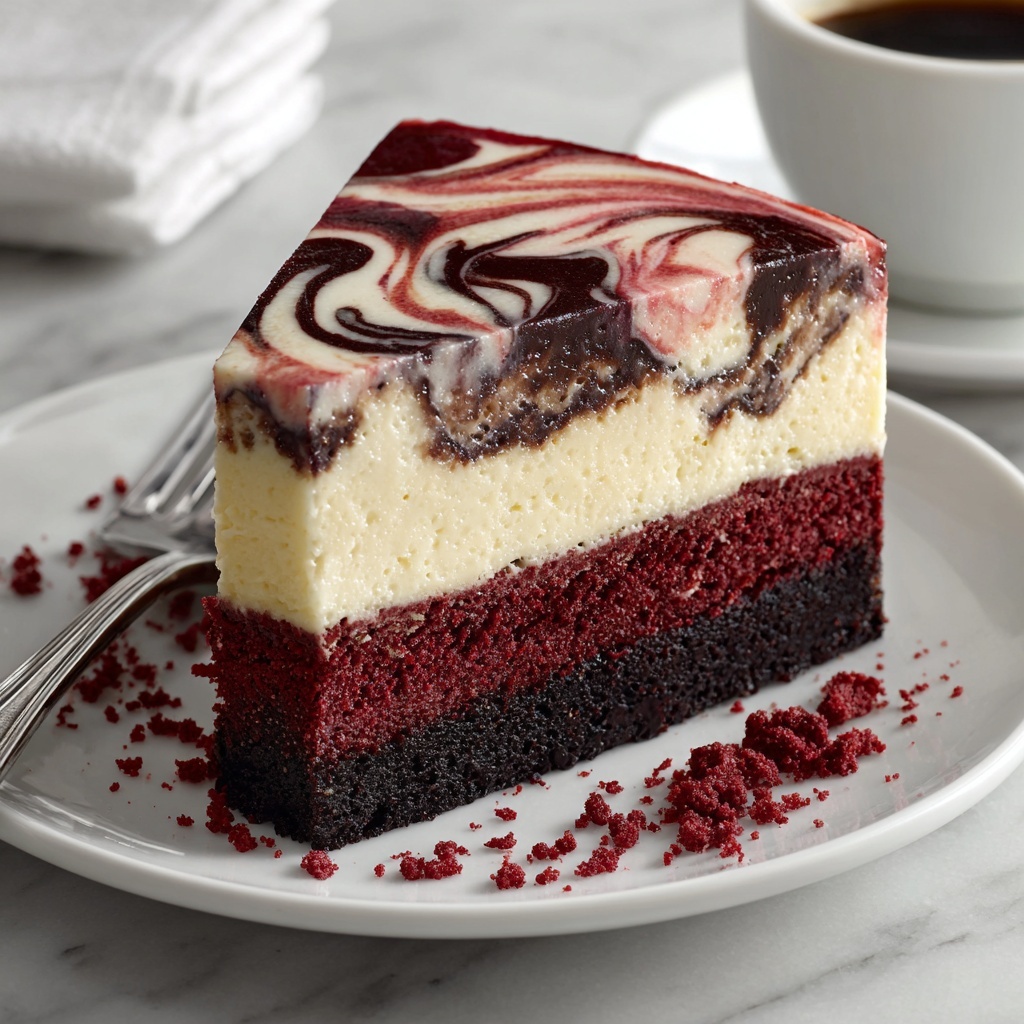
If you have a sweet tooth and adore that perfect blend of rich creaminess with a hint of cocoa, then this Homemade Red Velvet Cheesecake Recipe is going to become your new favorite indulgence. This showstopper dessert combines the deep, velvety flavors of classic red velvet cake with the luscious, smooth texture of cheesecake, all nestled on a crunchy Oreo crust that adds a delightful contrast. Each bite is a beautiful balance of color, flavor, and texture that is sure to impress your family and friends, whether it’s for a special occasion or just a cozy night in.
Ingredients You’ll Need
The ingredients for this Homemade Red Velvet Cheesecake Recipe are straightforward but essential, each playing a key role in achieving that flawless texture, vibrant color, and specialty flavor. From the crushed Oreos forming the perfect buttery base to the intense cocoa in the batter, everything comes together to make an unforgettable dessert.
- Crushed Oreo cookies (2 ½ cups / 250 g): Provides a rich, chocolatey, and sturdy crust with a little crunch to complement the cheesecake.
- Unsalted butter (5 tablespoons, melted + ¼ cup softened): Binds the crust and creates a creamy richness in the frosting.
- Cream cheese (32 ounces softened + 4 ounces softened): The heart of the cheesecake, offering a smooth, tangy flavor and luscious texture.
- Granulated sugar (1 ⅓ cups / 267 g): Sweetens the cheesecake batter perfectly without overpowering the other flavors.
- Cocoa powder (½ cup / 42 g): Adds that essential red velvet chocolate flavor, balancing sweetness and intensity.
- Sour cream (1 cup / 227 g, room temperature): Keeps the cheesecake moist and tender, lending a subtle tang that enhances the flavor.
- White vinegar (1 tablespoon): Reacts with baking elements to bring out the classic red velvet tang and tender crumb.
- Vanilla extract (2 tablespoons total): Provides warmth and depth to both the cheesecake and frosting layers.
- Red food coloring (1-2 ounces): Creates that iconic vibrant red hue that’s essential for red velvet.
- Large eggs (4, lightly beaten, room temperature): Help bind ingredients and add richness to the cheesecake batter.
- Confectioners’ sugar (2 cups / 260 g): Sweetens the frosting while keeping it smooth and creamy.
How to Make Homemade Red Velvet Cheesecake Recipe
Step 1: Prepare the Crust
Start by preheating your oven to 350°F (175°C). Wrapping the bottom of your 9-inch springform pan in two layers of heavy-duty aluminum foil is a smart tip to prevent any water from leaking into the crust during baking. Mix the crushed Oreo cookies with melted butter until the mixture is evenly coated, then press it firmly into the bottom and up the sides of the pan to create a crisp, chocolatey foundation. Bake this crust for 10 minutes, then allow it to cool completely. This step ensures a sturdy base that holds up beautifully against the creamy filling.
Step 2: Make the Cheesecake Batter
Reduce the oven temperature to 300°F (150°C) while you prepare the batter. Beat the softened cream cheese until it’s completely smooth to avoid any lumps. Then gradually add the granulated sugar and cocoa powder, mixing until fully incorporated. Next, add sour cream, white vinegar, vanilla extract, and the red food coloring – these ingredients combine to give that signature tang and vibrant color red velvet is famous for. Finally, gently fold in the lightly beaten eggs, careful not to overmix, so the batter stays light and airy.
Step 3: Bake in a Water Bath
Pour the luscious batter over your Oreo crust in the springform pan. Placing the cheesecake pan into a larger roasting pan filled halfway with boiling water creates a water bath that ensures steady, gentle heat. This method is key to preventing cracks and ensures the cheesecake sets with a silky, velvety texture. Bake for 1 hour, then turn off the oven but leave the cheesecake inside the water bath for another hour to finish setting perfectly without sudden temperature changes.
Step 4: Cool and Chill
Once the cheesecake has finished baking, remove the water bath and place the springform pan on a wire rack to cool to room temperature. Afterward, refrigerate the cheesecake for at least 4 hours or preferably overnight. This chilling step is crucial for the flavors to meld and for the cheesecake to firm up nicely for slicing.
Step 5: Prepare the Frosting and Finish
To top off your masterpiece, beat together the softened cream cheese and butter until creamy and smooth. Slowly add the confectioners’ sugar and vanilla extract, mixing until fluffy. Spread this luscious cream cheese frosting evenly over the chilled cheesecake, adding another layer of indulgent flavor and the perfect creamy finish to your Homemade Red Velvet Cheesecake Recipe.
How to Serve Homemade Red Velvet Cheesecake Recipe

Garnishes
For an eye-catching presentation, consider sprinkling the top with a few crushed Oreo crumbs or a light dusting of cocoa powder. Fresh berries like raspberries or strawberries offer a lovely contrast in flavor and color, adding a hint of brightness to every bite. Whipped cream rosettes or even a drizzle of melted white chocolate can elevate the elegance for special occasions.
Side Dishes
This cheesecake is rich and decadent on its own, but pairing it with a cup of freshly brewed coffee or a glass of cold milk can enhance the overall experience. A simple fruit salad or a scoop of vanilla bean ice cream also pairs beautifully, offering a refreshing balance to the dessert’s richness.
Creative Ways to Present
Slice your Homemade Red Velvet Cheesecake Recipe into generous wedges and serve on beautiful plates to highlight the striking red and cream layers. For a fun twist, you can turn leftovers into parfaits by layering crumbled cheesecake with whipped cream and fresh berries in glass cups. Offering bite-sized mini versions can make a charming addition to dessert tables at parties.
Make Ahead and Storage
Storing Leftovers
The best way to store leftover cheesecake is to cover it tightly with plastic wrap or keep it in an airtight container in the refrigerator. This keeps the flavors fresh and prevents it from absorbing other fridge odors. Properly stored, your cheesecake will stay delicious for up to 5 days, perfect for savoring over time or sharing with guests.
Freezing
If you want to keep your Homemade Red Velvet Cheesecake Recipe longer, freezing is a great option. Wrap the whole cake or individual slices securely in plastic wrap and then aluminum foil to avoid freezer burn. When stored properly, frozen cheesecake can maintain its best quality for up to 2 months without losing its creamy texture or flavor.
Reheating
While cheesecake is typically served chilled, if you prefer it slightly softer, just let the slices sit at room temperature for 15-20 minutes before serving. Avoid microwaving as it can affect texture, but a gentle warming in a low-temperature oven (around 200°F / 93°C) for a few minutes can help if desired.
FAQs
Can I use a different crust for this Homemade Red Velvet Cheesecake Recipe?
Absolutely! While the Oreo crust adds a fantastic chocolate flavor and crunch, you could swap it for a classic graham cracker crust or even a pecan crust for a nutty twist. Just make sure to adjust the butter amount to achieve the right consistency for pressing into your pan.
Is it necessary to use a water bath when baking this cheesecake?
Yes, the water bath is important because it provides gentle, even heat during baking, which helps prevent cracks and keeps the cheesecake creamy. It might feel a bit fussy but trust me, it’s worth the extra step for that perfect finish!
Can I substitute the red food coloring with natural alternatives?
Yes, natural options like beet juice or powder can be used, though they may slightly alter the taste and might not deliver as vibrant a red color. If you’re aiming for the classic look, gel or liquid food coloring works best.
Why does the cheesecake need to chill overnight?
Chilling overnight allows the cheesecake to set completely and lets the flavors meld beautifully. It also makes slicing neater and helps achieve that dense but creamy texture everyone loves.
Can this recipe be made gluten-free?
Definitely! Just use gluten-free Oreo cookies or substitute with another gluten-free crust option. The rest of the ingredients are naturally gluten-free, so you won’t lose any of the delicious flavor.
Final Thoughts
There’s something truly magical about this Homemade Red Velvet Cheesecake Recipe that combines comforting richness with vibrant color and a touch of elegance. Whether you’re celebrating a milestone or simply treating yourself to a luscious dessert, this recipe is worth every minute of effort. I can’t wait for you to bake it and share those first joyful bites with the people you love most!
Print
Homemade Red Velvet Cheesecake Recipe
- Prep Time: 30 minutes
- Cook Time: 1 hour 10 minutes
- Total Time: 6 hours 40 minutes
- Yield: 12 servings
- Category: Dessert
- Method: Baking
- Cuisine: American
Description
This Homemade Red Velvet Cheesecake combines the rich flavors of traditional red velvet cake with a creamy cheesecake texture. Featuring a crunchy Oreo cookie crust and a luscious cream cheese frosting, this cake is baked using a water bath method to ensure a smooth, crack-free finish. Perfect for special occasions or any time you crave an indulgent dessert.
Ingredients
Crust
- 2 ½ cups (250 g) crushed Oreo cookies (about 30 cookies)
- 5 tablespoons unsalted butter, melted
Cheesecake Filling
- 32 ounces (908 g) cream cheese, softened
- 1 ⅓ cups (267 g) granulated sugar
- ½ cup (42 g) cocoa powder
- 1 cup (227 g) sour cream, room temperature
- 1 tablespoon white vinegar
- 1 tablespoon vanilla extract
- 1–2 ounces red food coloring
- 4 large eggs, room temperature, lightly beaten
Frosting
- 4 ounces (113 g) cream cheese, softened
- ¼ cup (56 g) unsalted butter, softened
- 2 cups (260 g) confectioners’ sugar
- 1 teaspoon vanilla extract
Instructions
- Preheat Oven and Prepare Pan: Preheat your oven to 350°F (175°C). Wrap the bottom of a 9-inch springform pan with two layers of heavy-duty aluminum foil to prevent water from leaking into the crust during baking.
- Make the Crust: Mix the crushed Oreo cookies with the melted butter until well combined. Press this mixture evenly into the bottom and slightly up the sides of the prepared springform pan to form the crust. Bake for 10 minutes, then remove from oven and allow to cool.
- Prepare the Cheesecake Filling: Reduce the oven temperature to 300°F (150°C). Beat the softened cream cheese until smooth and creamy. Gradually add the granulated sugar and cocoa powder, mixing thoroughly. Add sour cream, white vinegar, vanilla extract, and red food coloring, mixing to combine. Gently fold in the lightly beaten eggs, ensuring a smooth batter without overmixing.
- Bake the Cheesecake: Pour the cheesecake batter over the cooled crust in the springform pan. Place the pan inside a larger roasting pan and carefully pour boiling water into the roasting pan to come halfway up the sides of the springform pan. Bake the cheesecake for 1 hour at 300°F (150°C). After baking, turn off the oven and leave the cheesecake in the water bath inside the oven for an additional hour to set gently.
- Cool and Chill: Remove the cheesecake from the oven and water bath. Let it cool on a wire rack to bring it to room temperature. Then refrigerate the cheesecake for at least 4 hours or overnight to fully set and develop flavors.
- Prepare the Frosting: In a bowl, beat the softened cream cheese and softened butter together until smooth and creamy. Gradually add the confectioners’ sugar and vanilla extract, mixing until the frosting is fluffy and well combined.
- Frost and Serve: Once the cheesecake is thoroughly chilled, remove it from the springform pan, frost the top evenly with the prepared cream cheese frosting, slice, and serve.
Notes
- Wrapping the springform pan’s bottom with aluminum foil is essential to prevent water from leaking during the water bath baking.
- Using room temperature ingredients ensures a smooth, lump-free cheesecake batter.
- Be careful not to overmix the eggs into the batter to avoid cracking.
- The water bath baking method helps achieve a creamy texture without cracks.
- Allowing the cheesecake to chill overnight will improve its firmness and flavor.
- Red food coloring can be adjusted to achieve your preferred shade of red velvet.


