
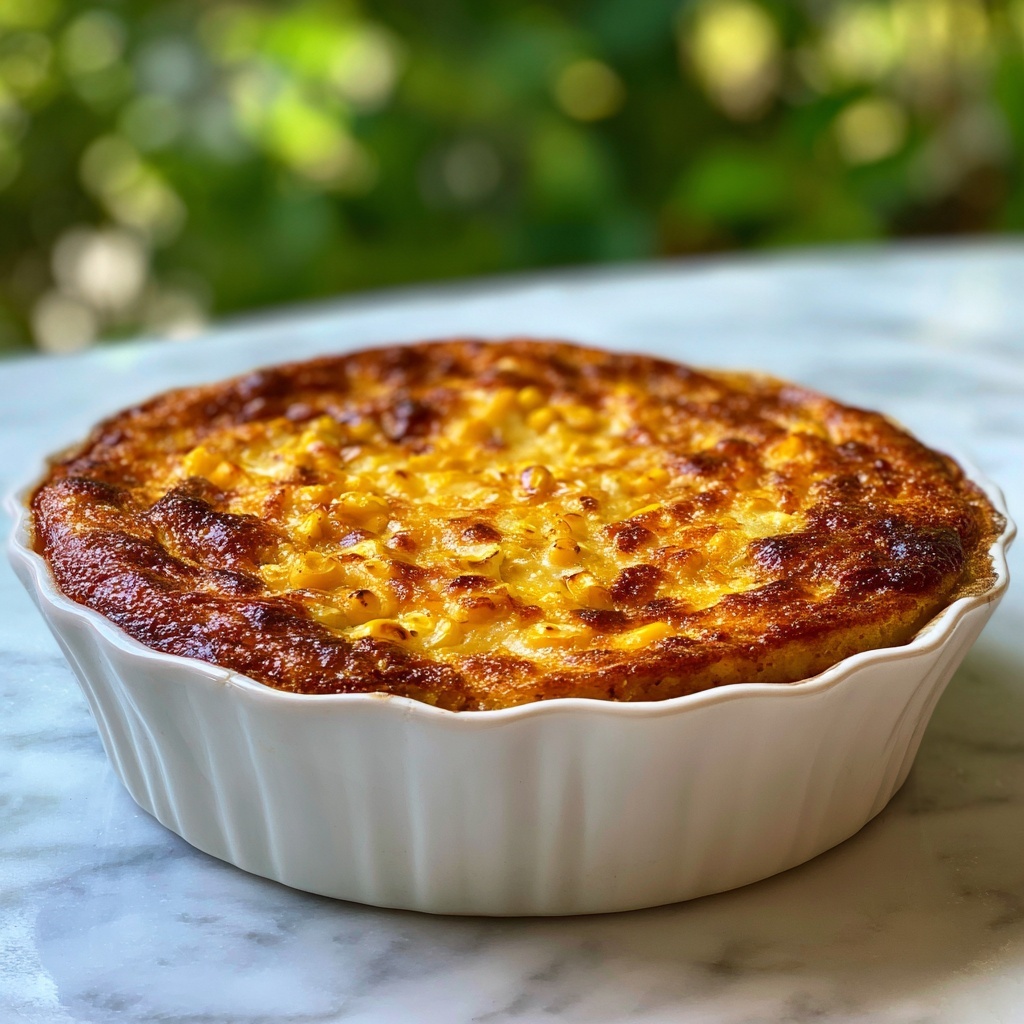
If you are looking for a dish that blends comforting creaminess with the natural sweetness of corn, you are going to adore this Creamy Baked Corn Pudding Casserole Recipe. It’s the type of side dish that immediately transports you to cozy family dinners, yet it’s surprisingly simple to make with pantry staples. The combination of whole kernel corn and creamed corn creates a luscious texture that is perfectly balanced with just the right touch of savory, a bit of tang from sour cream, and a hint of buttery goodness. This casserole is a showstopper for holiday tables or any meal that calls for a crowd-pleaser.

Ingredients You’ll Need
These ingredients are straightforward but work together like magic to create that smooth, slightly sweet, and soulful corn pudding everyone will rave about. Each element lends its own unique character to the dish, from richness and moisture to structure and seasoning.
- Whole kernel corn (2 cans, drained): Provides bursts of juicy sweetness and texture contrast.
- Creamed corn (1 can): Adds moisture and smoothness that makes the casserole wonderfully creamy.
- Unsalted butter (1/2 cup, melted): Brings a rich, mellow flavor and helps bind the ingredients.
- Sour cream (1 cup): Gives tang and richness while keeping the pudding tender.
- Large eggs (2, beaten): Essential for structure and that classic custard-like set.
- Granulated sugar (1/2 cup): Balances savory notes with its gentle sweetness.
- All-purpose flour (1/4 cup): Works as a thickening agent for the perfect pudding texture.
- Salt (1/2 tsp): Enhances all the flavors harmoniously.
- Black pepper (1/4 tsp): Adds just a whisper of warmth.
- Baking powder (1/2 tsp): Lightens the texture slightly for a fluffy finish.
- Shredded cheddar cheese (1 cup, optional): For extra richness and melty delight if you want to take it to the next level.
How to Make Creamy Baked Corn Pudding Casserole Recipe
Step 1: Prepare the Oven and Baking Dish
Start by preheating your oven to 350°F (175°C). Grease a 9×9-inch or a 2-quart casserole dish thoroughly with butter or non-stick spray to make sure your pudding comes out perfectly without any sticking. This step is key for easy serving later on.
Step 2: Combine the Wet Ingredients
In a large mixing bowl, whisk together the melted butter, sour cream, and beaten eggs until they form a uniform, smooth batter. This base is what gives the pudding its luscious, creamy texture and tangy flavor.
Step 3: Add the Dry Ingredients
To your wet mixture, add the granulated sugar, flour, salt, pepper, and baking powder. Mix well until everything is just combined and the batter is smooth. These ingredients balance sweetness, seasoning, and help set the pudding beautifully in the oven.
Step 4: Stir in the Corn
Gently fold in both the drained whole kernel corn and the creamed corn. Stir until the corn is evenly distributed throughout the batter, ensuring every bite bursts with sweet corn flavor and a velvety finish.
Step 5: Add Cheese (Optional)
If you love a bit of extra creamy, cheesy goodness, fold in a full cup of shredded cheddar cheese at this point. It melts into the pudding as it bakes, enriching it with a subtle sharpness and gooey texture that’s simply irresistible.
Step 6: Assemble and Bake
Pour the batter into your prepared baking dish and smooth the top with a spatula. Place it in the preheated oven and bake for 45 to 50 minutes. You’ll know it’s ready when the top turns a beautiful golden brown color and the pudding is set and firm to the touch.
Step 7: Cool and Serve
Once baked, allow the casserole to cool for about 5 to 10 minutes before serving. This brief rest helps the pudding set fully and makes it easier to cut into neat squares, ready to delight your family and guests.
How to Serve Creamy Baked Corn Pudding Casserole Recipe
Garnishes
A simple sprinkle of chopped fresh herbs like parsley or chives adds a fresh pop of color and flavor to this creamy casserole. For a touch of vibrant appeal, a light dusting of smoked paprika or a few cracks of fresh black pepper work wonders.
Side Dishes
This dish pairs beautifully with roasted meats such as turkey, ham, or chicken. Its sweet and savory profile complements hearty mains perfectly, making it a staple side for fall and holiday meals. Add a crisp green salad or steamed veggies for a balanced plate.
Creative Ways to Present
For a festive presentation, serve the corn pudding in individual ramekins or mini cast iron skillets. You can also top each portion with a crispy sprinkle of fried shallots or crumbled bacon for an added layer of indulgence and texture contrast.
Make Ahead and Storage
Storing Leftovers
Leftover Creamy Baked Corn Pudding Casserole Recipe tastes just as magical the next day. Store any leftovers tightly covered in the refrigerator for up to 4 days. This casserole reheats nicely without losing its creamy texture.
Freezing
You can freeze this corn pudding! Let it cool completely, then transfer to an airtight container or freezer-safe dish. Freeze for up to 2 months. When you’re ready, thaw overnight in the refrigerator before reheating.
Reheating
Reheat your leftover casserole in a 350°F oven for 15-20 minutes until warmed through. Cover loosely with foil to avoid drying out, and remove the foil in the last few minutes to restore its golden crust.
FAQs
Can I make this recipe dairy-free?
Absolutely! Substitute the butter with a dairy-free margarine and use a lactose-free sour cream or a creamy dairy-free alternative like coconut yogurt to keep it just as moist and delicious.
How can I make this dish gluten-free?
Swap the all-purpose flour with a gluten-free flour blend. Most blends will give you a similar texture, just double-check the baking powder you use is gluten-free as well.
Is this casserole suitable for meal prep?
Definitely. This recipe holds up well in the fridge and heats up beautifully, making it perfect for meal prepping or cooking ahead for busy weeknights.
Can I add other vegetables to this corn pudding?
Yes! Small amounts of finely chopped jalapeño, red bell pepper, or even green onions can add interesting flavors without overpowering the creamy corn base.
What if I don’t want to add cheese?
The recipe is delicious without cheese, but if you skip it, consider adding a pinch more salt or a little smoked paprika for a flavor boost to keep things exciting.
Final Thoughts
If you’ve been searching for a comforting, crowd-pleasing side that feels like a warm hug on a plate, the Creamy Baked Corn Pudding Casserole Recipe is your new best friend. Its perfect balance of creamy texture, sweet corn flavor, and a hint of savory goodness make it an easy favorite for family dinners and special occasions alike. So go ahead, gather your simple ingredients, and create this little delicious masterpiece—you’re going to fall in love with every bite.
Print
Creamy Baked Corn Pudding Casserole Recipe
- Prep Time: 15 minutes
- Cook Time: 45-50 minutes
- Total Time: 1 hour
- Yield: 6 servings
- Category: Side Dish
- Method: Baking
- Cuisine: American
Description
This Corn Pudding Casserole is a creamy, comforting side dish perfect for holiday dinners or family gatherings. Made with a mixture of whole kernel corn, creamed corn, melted butter, sour cream, and eggs, it’s lightly sweetened and baked to a golden brown. Optional shredded cheddar cheese adds extra richness and flavor. It pairs wonderfully with roasted meats, turkey, or ham, making it a versatile and crowd-pleasing addition to your meal.
Ingredients
Corn Ingredients
- 2 cans (15 oz each) whole kernel corn, drained
- 1 can (15 oz) creamed corn
Wet Ingredients
- 1/2 cup unsalted butter, melted
- 1 cup sour cream
- 2 large eggs, beaten
Dry Ingredients
- 1/2 cup granulated sugar
- 1/4 cup all-purpose flour
- 1/2 tsp salt
- 1/4 tsp black pepper
- 1/2 tsp baking powder
Optional Ingredients
- 1 cup shredded cheddar cheese (optional, for extra richness)
Instructions
- Prepare the Oven & Baking Dish: Preheat your oven to 350°F (175°C). Grease a 9×9-inch or 2-quart casserole dish with butter or cooking spray to prevent sticking.
- Combine Wet Ingredients: In a large mixing bowl, whisk together the melted butter, sour cream, and beaten eggs until the mixture is smooth and well combined.
- Add Dry Ingredients: To the wet mixture, add the sugar, flour, salt, pepper, and baking powder. Stir until all the dry ingredients are fully incorporated and the batter is smooth.
- Add the Corn: Gently fold in both the drained whole kernel corn and creamed corn, ensuring the corn is evenly distributed throughout the batter.
- Optional Cheese Addition: If desired, fold in the shredded cheddar cheese to add creaminess and a tangy flavor boost to the casserole.
- Assemble the Casserole: Pour the prepared corn mixture into the greased baking dish, spreading it out evenly to promote uniform baking.
- Bake: Place the casserole in the preheated oven and bake for 45-50 minutes, or until the top turns golden brown and the pudding is set and firm to the touch.
- Serve & Enjoy: Allow the casserole to cool for a few minutes before serving. This dish is best enjoyed warm and pairs beautifully with roasted meats, turkey, or ham.
Notes
- Drain the canned corn thoroughly to avoid excess moisture in the casserole.
- For a dairy-free version, substitute butter and sour cream with plant-based alternatives.
- The shredded cheddar cheese is optional but adds a richer flavor and creamier texture.
- Use a glass or ceramic baking dish for even baking and easy monitoring of doneness.
- This casserole can be prepared ahead of time and refrigerated until ready to bake.


