
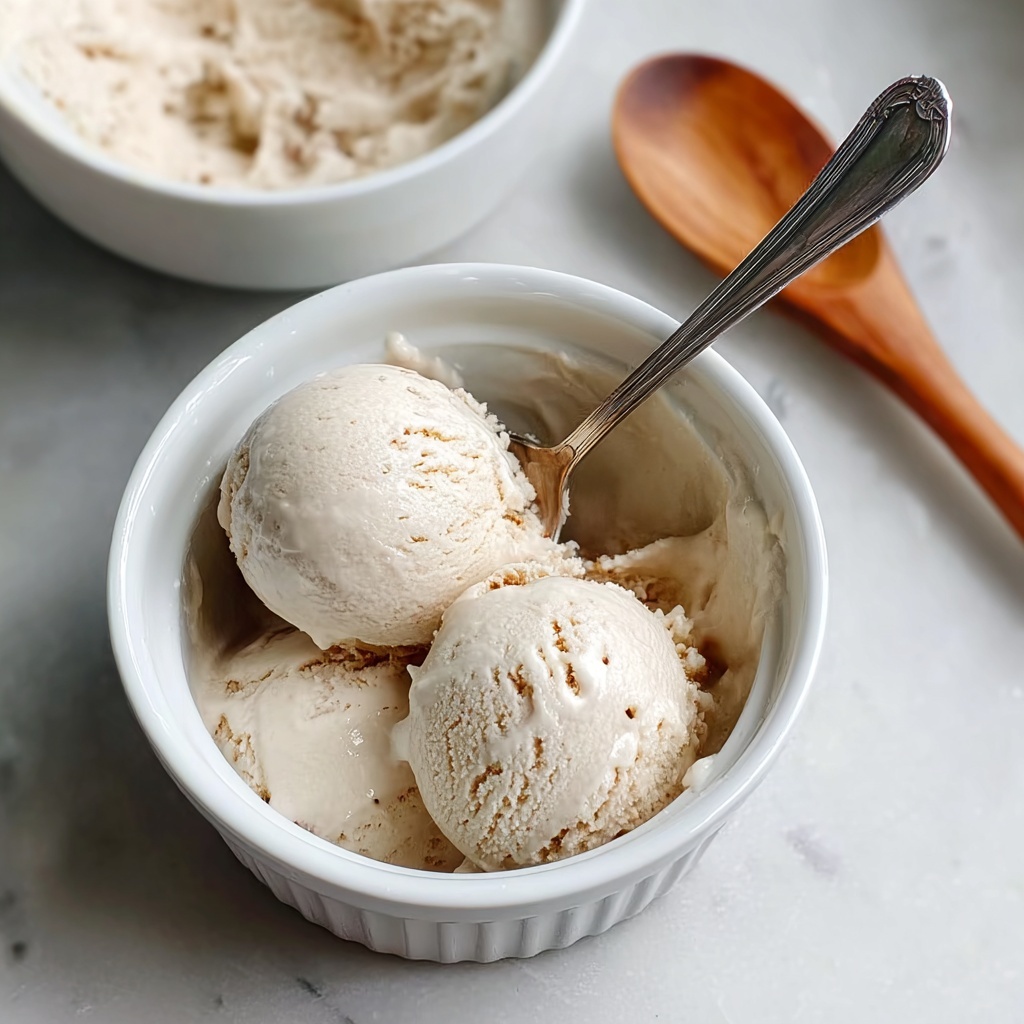
If you have been searching for a rich, creamy, and utterly delightful dessert without any dairy, then you are in for a real treat with this Vanilla Vegan Ice Cream: An Incredible Ultimate Recipe. Imagine the smoothness of coconut milk blending effortlessly with the warm, comforting aroma of pure vanilla. This recipe is not only a breeze to make but it also captures the essence of classic ice cream while being completely plant-based, dairy-free, and gluten-free. Whether you’re vegan or simply craving a luscious frozen treat, this ice cream will quickly become your new favorite indulgence.
Ingredients You’ll Need
Simple ingredients make the best treats, and each one here plays a crucial role in creating the perfect vegan vanilla ice cream. From creamy coconut milk to the subtle sweetness of cane sugar, these essentials promise outstanding texture and flavor.
- Full-fat coconut milk, 2 cans: The creamy base that gives this ice cream its luscious texture without dairy.
- Organic cane sugar, 3/4 cup: Adds just the right amount of sweetness to balance the coconut richness.
- Cornstarch, 2 tablespoons: A natural thickener that helps achieve that silky, scoopable consistency.
- Pure vanilla extract, 1 tablespoon: Brings the warm, classic vanilla flavor to life with every bite.
- Salt, 1/8 teaspoon: Enhances all the flavors, making the sweetness and vanilla notes really pop.
How to Make Vanilla Vegan Ice Cream: An Incredible Ultimate Recipe
Step 1: Prepare the Cornstarch Mixture
Start by shaking the cans of coconut milk vigorously to combine the cream and water inside. Then pour half a cup of it into a small bowl and whisk the cornstarch in until completely smooth. This step is key to avoiding any lumps and ensuring a creamy final texture.
Step 2: Heat the Coconut Milk Mixture
In a medium saucepan, combine the remaining coconut milk with the organic cane sugar and salt. Warm this gently over medium heat, stirring often. You want to dissolve the sugar completely and heat the mixture until it’s warm but not boiling so it’s ready for thickening.
Step 3: Thicken with Cornstarch
Slowly stir your cornstarch slurry into the warm coconut milk mixture. Keep a close eye and stir constantly for about 3 to 5 minutes until it thickens slightly. That thickened base is what will give your ice cream that perfect creamy body without reforming into a solid pudding.
Step 4: Add Vanilla and Chill
Remove the pan from heat and stir in the pure vanilla extract. This infusion gives the ice cream its signature fragrance and taste. Allow the mixture to cool to room temperature, then cover and refrigerate for at least 4 hours, or better yet, overnight. This chilling step is essential for great churned texture.
Step 5: Churn and Freeze
Pour your fully chilled base into your ice cream maker and churn following the manufacturer’s instructions until it reaches a soft-serve consistency. Transfer to a freezer-safe container and freeze for an additional 2 to 4 hours to firm up before serving. Your homemade vegan dessert is now ready to wow!
How to Serve Vanilla Vegan Ice Cream: An Incredible Ultimate Recipe

Garnishes
Enhance your vanilla vegan ice cream masterpiece with toppings that add both freshness and texture. Try a sprinkle of toasted coconut flakes, a drizzle of dark chocolate sauce, or a handful of juicy berries. These add vibrant color and a delightful contrast that lifts every spoonful.
Side Dishes
Pair this luscious ice cream with warm seasonal fruit crumbles, dairy-free brownies, or even vegan cookies for a dessert spread that feels like a celebration. The subtle vanilla notes complement a wide variety of desserts, turning any gathering into a memorable indulgence.
Creative Ways to Present
Serve your ice cream in charming small mason jars for easy sharing, or place scoops atop waffle cones sprinkled with crushed nuts for an exciting twist. Even layering it between vegan chocolate cake for a parfait adds a special touch. Let your imagination run wild with presentation just as much as flavor!
Make Ahead and Storage
Storing Leftovers
Any leftovers should be stored covered in a freezer-safe container to protect the ice cream’s delicate texture and prevent it from drying out or absorbing other flavors from your freezer. Keep it tightly sealed and use within one week for best quality.
Freezing
This recipe freezes beautifully due to the coconut milk base and cornstarch thickener. Just remember to give the ice cream some time at room temperature before scooping to get that perfect creamy softness back after freezing.
Reheating
While this ice cream is best served cold, if it freezes too hard, simply let it sit out for 5 to 10 minutes before scooping. Avoid microwaving as it can melt unevenly and ruin the texture. Patience here truly earns the creamiest results.
FAQs
Can I use a different type of milk instead of coconut milk?
Coconut milk is recommended for its creaminess and fat content, which help mimic traditional ice cream texture. Plant milks like almond or soy tend to be too watery on their own but can be used if thickened with additional stabilizers.
Is cornstarch necessary in this recipe?
Yes, cornstarch acts as a thickener that prevents ice crystals and gives the ice cream that smooth, scoopable consistency. Skipping it might result in a less creamy texture.
Can I make this ice cream without an ice cream maker?
It’s possible but more challenging. You’d need to freeze the mixture in a shallow container and stir vigorously every 30 minutes to break up ice crystals until firm.
How can I intensify the vanilla flavor?
For a richer vanilla punch, use vanilla bean seeds in addition to the extract or increase the extract slightly. Both will up the aromatic profile beautifully.
Is this recipe suitable for people with nut allergies?
Absolutely! This recipe contains no nuts and relies on coconut milk, which is a fruit, making it safe for those with nut allergies. Always check labels to be sure your ingredients are processed in nut-free facilities if cross-contamination is a concern.
Final Thoughts
Nothing beats the joy of making your own creamy, dreamy Vanilla Vegan Ice Cream: An Incredible Ultimate Recipe right in your kitchen. It’s a dessert that feels indulgent yet kind to your body and the planet. Don’t hesitate to whip up a batch and share the joy with friends and family — once you taste this, you’ll wonder why you ever bought store-bought again!
Print
Vanilla Vegan Ice Cream: An Incredible Ultimate Recipe
- Prep Time: 10 minutes
- Cook Time: 5 minutes
- Total Time: 4 hours 15 minutes
- Yield: 6 servings
- Category: Dessert
- Method: Churning
- Cuisine: American
- Diet: Vegan
Description
This Vanilla Vegan Ice Cream recipe is a creamy, dairy-free dessert made with full-fat coconut milk and organic cane sugar, offering a smooth texture and rich vanilla flavor. Perfect for those following vegan, gluten-free, and dairy-free diets, this homemade ice cream is churned to perfection and can be customized with optional ingredients for enhanced creaminess and flavor.
Ingredients
Main Ingredients
- 2 cans full-fat coconut milk
- 3/4 cup organic cane sugar
- 2 tablespoons cornstarch
- 1 tablespoon pure vanilla extract
- 1/8 teaspoon salt
Instructions
- Prepare Cornstarch Slurry: Shake the cans of coconut milk well before opening. Pour 1/2 cup of the coconut milk into a small bowl and whisk in the cornstarch until completely smooth to create a slurry that prevents lumps in the ice cream base.
- Heat Base Mixture: In a medium saucepan, combine the remaining coconut milk, organic cane sugar, and salt. Heat over medium heat, stirring frequently, until the sugar dissolves and the mixture is warm but not boiling, ensuring even heating and sugar dissolution.
- Thicken Mixture: Stir in the cornstarch slurry and continue cooking the mixture, stirring constantly for about 3 to 5 minutes, until it slightly thickens, forming the creamy texture needed for ice cream.
- Add Vanilla: Remove the pan from heat and stir in the pure vanilla extract to infuse the base with rich vanilla flavor.
- Chill: Allow the mixture to cool to room temperature, then cover and refrigerate for at least 4 hours or until completely chilled, which is essential for proper churning and texture.
- Churn Ice Cream: Pour the chilled mixture into an ice cream maker and churn according to the manufacturer’s instructions until it reaches a soft-serve consistency, transforming the base into creamy ice cream.
- Freeze: Transfer the churned ice cream to a freezer-safe container and freeze for 2 to 4 hours until firm, to develop the perfect scoopable texture.
- Serve: Let the ice cream sit at room temperature for a few minutes before scooping to soften slightly for easier serving.
Notes
- For extra creaminess and to reduce iciness, add 1 tablespoon of vodka before churning.
- You can substitute maple syrup for cane sugar if you prefer a refined sugar-free option.
- For a more intense vanilla flavor, stir in vanilla bean seeds along with the vanilla extract.

